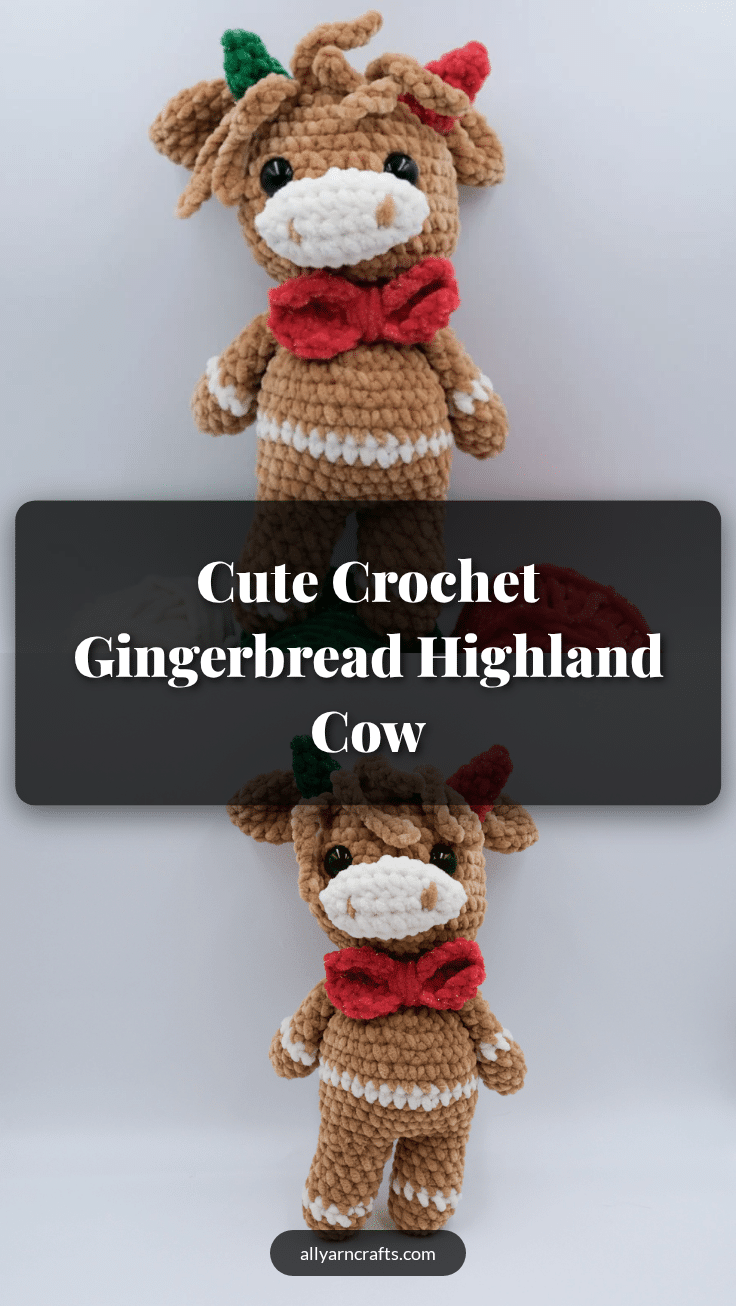
There is something incredibly soothing about the rhythm of a quiet evening spent crocheting. With a small batch of soft yarn in hand, the world slows down to the gentle click of the hook and the steady count of stitches. This is the perfect ritual for creating something with heart, especially during the holiday season. Meet Molly, the adorable crochet Gingerbread Highland Cow, a project designed to be both quick and comforting to make. Whether you are a seasoned maker or just starting your amigurumi journey, this pattern invites you to unwind while crafting a festive friend that brings a touch of whimsy to your holidays.
Small Details That Make It Better
What truly sets Molly apart is the charming interplay of textures and colors that mimic a classic gingerbread treat. The pattern utilizes chenille yarn for a plush, velvety finish that feels wonderful to touch, though you can adapt this to cotton or acrylic depending on your preference. The “frosting” effect is achieved through strategic color changes, using a cream yarn for the snout and belly accents that contrast beautifully against the warm brown primary color. The addition of glitter yarn for the horns and bow adds a subtle sparkle, elevating the cow from a simple farm animal to a festive holiday icon. These small finishing touches, like pinching the ears to create a natural curve and shaping the horns by hand, give Molly a unique personality that mass-produced toys simply can’t match.
Project Overview
Molly is a charming amigurumi Highland Cow designed with a gingerbread theme. The construction is unique in that the feet and body are crocheted as a single continuous piece, while the head, horns, nose, ears, and arms are made separately and sewn on. All parts are worked in continuous rounds, ensuring a seamless look. This design is perfect for holiday gifts, nursery decor, or as a cozy companion for your own collection.
Materials
You will need four colors of yarn. The featured example uses chenille yarn, but other yarns such as cotton and acrylic can be used. Note that if you change the yarn type, you should use a hook that fits your yarn, as the finished size will change.
- Color A (Primary color, brown): About 70 g
- Color B (Frosting and snout, cream): About 20 g
- Color C (Horn and bow, red glitter): About 30 g
- Color D (Bow, green glitter): About 10 g
Tools:
- 4.5 mm crochet hook
- Filling materials
- Scissors
- Safety eyes
- 20 mm knitting needles (for support when attaching body parts)
- Empty toilet roll or similar (for support of the head)
Gauge and Finished Size
Finished size: 34 cm / 13.3 inches (when worked up with the same yarn as the pattern uses).
Note: Gauge is not strictly defined in the source, but maintaining consistent tension is key to achieving the correct size, especially when using chenille yarn.
Abbreviations
- ch – chain
- rnd – round
- St(s) – stitches
- Inc – increase
- dec – decrease
- sc – single crochet
- mr – magic ring
- sl st – slip stitch
Pattern Notes
- The feet and body are crocheted together in one piece.
- All parts are made in continuous rounds.
- Leave long tails on all pieces for sewing during assembly.
Pattern Instructions
Feet and Body
The feet and body are made in one piece. First, we start with the feet. The feet will later be joined, and the body will be crocheted on top of the feet.
Feet
Make 2
In color A and B. Start with color A.
Rnd 1: 6 sc into a mr (6 sc)
Rnd 2: 2 sc in each st around (12 sc)
Rnd 3-4: 1 sc in each st for 2 rounds. Change to color B on the last pull-through of the last sc of round 4.
Rnd 5: 1 sc in each st. Change to color A on the last pull-through of the last sc of round 5.
Rnd 6-10: 1 sc in each st for 5 rounds.
Fasten off for the first leg, do not fasten off for the second.
Extra Help: Joining Legs
Do not cut the yarn on the second foot. Place the feet next to each other and join them as follows:
- Place the feet side by side.
- Join the feet with single crochet, going from the working leg directly into the other leg, and connect them with single crochet.
- Place a stitch marker after the first stitch.
- Continue crocheting around both feet, working 1 single crochet (sc) in each stitch around. Be sure to work across both feet, including the stitches from the joining slip stitch if necessary.
- You should have a total of 24 single crochet (sc) stitches at the end of the round.
From here, follow the pattern as instructed to continue crocheting the feet and body as one piece.
Body
Join Legs + Start Body
Rnd 11 (joining round): With the second leg still on hook – 1 sc in each of the 12 sts of the second leg, (24 sts total around both legs). Place a stitch marker; this is now the new beginning of the round (preferably center back).
Rnd 12: sc in each st around (24 sc)
Rnd 13: (3 sc, sc inc) x 6 (30 sc)
Rnd 14: Change to color B, SC around (30 sc)
Rnd 15-22: Change to color A, SC around for 8 rounds. (30 sc)
Rnd 23: (3 sc, sc dec) x 6 (24 sc). Add stuffing.
Rnd 24: (2 sc, sc dec) x 6 = (18 sc)
Rnd 25: (1 sc, sc dec) x 6 = (12 sc). Sl st into the first stitch and fasten off. Leave a long tail for sewing.
Head
Color A
Rnd 1: 12 sc into a mr (12 sc)
Rnd 2: 2 sc in each st around (24 sc)
Rnd 3: (3 sc, sc inc) x 6 (30 sc)
Rnd 4: (4 sc, sc inc) x 6 (36 sc)
Rnd 5-12: 1 sc in each st for 8 rounds.
Rnd 13: (4 sc, sc dec) x 6 (30 sc)
Rnd 14: (3 sc, sc dec) x 6 (24 sc). Add stuffing. Place the safety eyes between rounds 10 and 11, 6 sc stitches apart.
Rnd 15: (2 sc, sc dec) x 6 = (18 sc)
Rnd 16: (1 sc, sc dec) x 6 = (12 sc). Sl st into the first stitch and fasten off. Leave a long tail for sewing.
Horn
Make 2 (One in color C and one in color D)
Rnd 1: 4 sc in a mr (4 sc)
Rnd 2: 4 sc
Rnd 3: sc inc, 3 sc (5 sc)
Rnd 4: sc inc, 4 sc (6 sc)
Rnd 5: sc inc, 5 sc (7 sc)
Sl st into the first sc and fasten off. Leave a tail for sewing. Shape it with your hands.
Nose
In color B
Rnd 1: Ch 11, 1 sc in each st. (10 sc). Work on the opposite side, 1 sc in each st. (20 sc). Place a stitch marker before round 2.
Rnd 2: Sc inc, 9 sc, sc inc, 9 sc. (22 sc)
Rnd 3: Sc inc, 10 sc, sc inc, 10 sc. (24 sc)
Rnd 4: 1 sc in each st. (24 sc)
Sl st into the first st and fasten off. Leave a long tail for sewing.
Ears
In color A
Rnd 1: 4 sc in a mr
Rnd 2: sc inc x 4 (8 sc)
Rnd 3: (1 sc, sc inc) x 4 (12 sc)
Rnd 4-6: 1 sc in each st for 3 rounds.
Rnd 7: (1 sc, sc dec) x 4 (8 sc)
Rnd 8: 1 sc in each st (8 sc)
Sl st into the first sc and fasten off. Leave a long tail for sewing. Grab the tail and pinch the ear together on rounds 1-2. Sew back and forth to shape the ear.
Arms
Make 2
In color A and B. Start with color A.
Rnd 1: 6 sc into a mr (6 sc)
Rnd 2: 2 sc in each st around (12 sc)
Rnd 3-4: 1 sc in each st for 2 rounds. Change to color B on the last pull-through of the last sc of round 4.
Rnd 5: 1 sc in each st. Change to color A on the last pull-through of the last sc of round 5.
Rnd 6-10: 1 sc in each st for 5 rounds.
Do not stuff the arms. Close the hole with single crochet.
Assembly
1. Join Legs: Ensure the legs are joined correctly as described in the pattern instructions before proceeding to the body.
2. Attach Head: Use the empty toilet roll or similar support to help stabilize the head while sewing it onto the body.
3. Attach Horns: Sew the two horns to the top of the head.
4. Attach Nose: Sew the nose to the front of the head, below the eyes.
5. Attach Ears: Pinch the base of the ears (rounds 1-2) and sew them to the sides of the head.
6. Attach Arms: Sew the arms to the sides of the body.
7. Final Touches: Use the knitting needles for support if needed when attaching body parts to ensure they stand upright.
Tips
When working with chenille yarn, be careful not to stretch the stitches too tightly, as this can make it difficult to insert the hook in subsequent rounds. If you choose to use a different yarn weight, remember that the finished size of Molly will change. Always weave in ends securely to prevent the stuffing from showing through over time.
FAQs
Can I use a different type of yarn?
Yes, you can use cotton or acrylic yarn. However, keep in mind that the size and look of the cow will change depending on the yarn weight and fiber content. You should also adjust your hook size to match the yarn requirements.
How do I join the feet correctly?
Do not cut the yarn on the second foot. Place the feet side by side and join them by working single crochet stitches from the working leg directly into the other leg. Ensure you have a total of 24 stitches after joining before continuing with the body.
What size safety eyes should I use?
The pattern specifies using safety eyes placed between rounds 10 and 11 of the head, 6 sc stitches apart. The exact size isn’t specified, but standard 7mm or 8mm safety eyes typically work well for a 34cm amigurumi.
Why are the arms not stuffed?
The arms are left unstuffed to allow for a floppy, natural look typical of Highland cows. They are closed with single crochet stitches at the end.
How do I shape the ears?
After sewing the ears on, grab the tail end and pinch the ear together on rounds 1-2. Sew back and forth across the base of the ear to create a curved, natural shape.
Pin This Crochet Pattern!