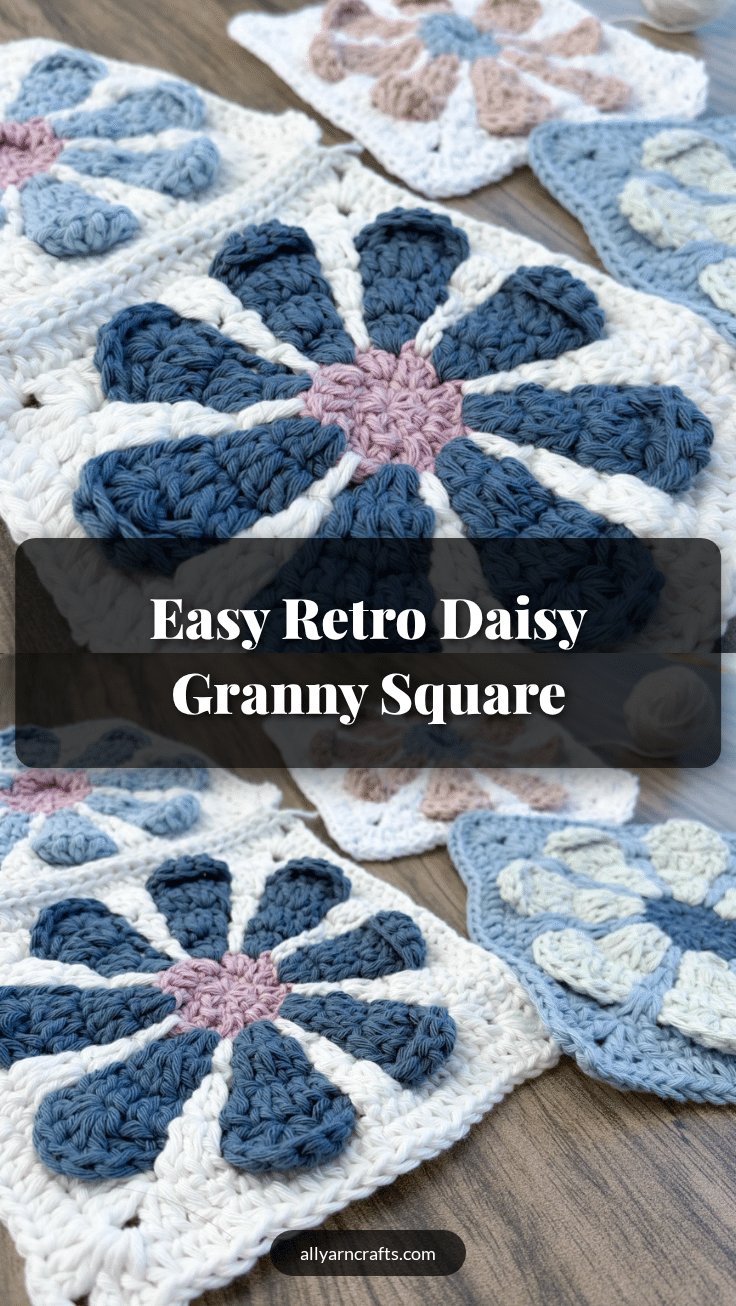
The Retro Daisy Granny Square is a stunning blend of vintage charm and modern versatility. With its intricate layering and dimensional petals, this project offers a satisfying challenge that rewards crocheters with a beautiful, textured motif. Whether you are looking to add a touch of 1970s nostalgia to your home or build a statement garment, this square provides the perfect foundation. The unique construction allows for endless color experimentation, making each finished piece a unique work of art.
Texture and Stitch Notes
What makes this pattern truly special is the interplay between the flat granny square structure and the raised, dimensional flower. The magic lies in the layering technique used in the middle rounds. By working chains behind the petal clusters and then returning to work over them, you create a “tunnel” effect that gives the flower its depth. Pay close attention to the instruction to push the Round 3 stitches toward the back while working Round 4; this tension control is key to keeping the square flat. The texture shifts from the tight, smooth center to the open, airy petals, and finally to the structured background, creating a tactile experience that is as pleasing to the eye as it is to the touch.
Project Overview
This wearable-friendly motif is a modern take on the classic granny square. It features a three-color construction that creates a retro daisy effect. The pattern is designed to be addictive, moving from a simple center to a complex, multi-layered flower, and finally to a structured square background. It is ideal for blankets, cardigans, bags, and home decor.
Materials
- Yarn: DK weight yarn in 3 colors (Color A: Flower Centre, Color B: Petals, Color C: Background). Approx. 10 g per color per square.
- Hook: 4.0 mm crochet hook (or 3.5 mm depending on your yarn recommendation).
- Notions: Yarn needle for weaving in ends, scissors.
Gauge and Finished Size
Finished Size: 17 × 17 cm (approx. 6.7 × 6.7 in) using DK weight yarn and a 4.0 mm hook.
Note: Gauge and finished size may vary depending on your yarn and tension. The beauty of granny squares is that small differences in gauge don’t matter much—just ensure all your squares match each other if you’re joining them into a larger project, such as the cozy crochet blankets featured in our collection.
Abbreviations
- ch = chain
- ch-sp = chain space
- sl st = slip stitch
- sc = single crochet
- hdc = half double crochet
- dc = double crochet
- dc inc = double crochet increase (work 2 dc in the same stitch)
- st = stitch
- sts = stitches
- sk = skip
- rep = repeat
- rnd = round
- MR = magic ring
- FO = fasten off
Pattern Notes
The Retro Daisy Granny Square reminds me of the 1970s, and it is currently trending on social media for boho blankets and handmade cardigans. While it may seem challenging at first, once you understand the layering logic, it is hard to stop. First, you make one, then two, and suddenly you are making twenty!
Color Tip: When planning a blanket, choose a background color that will work with all your flower combinations. A neutral like cream, oatmeal, or grey tends to unify even very different flower colors beautifully.
Pattern Instructions
Round 1 (Color A – Center)
Using Color A, create a magic ring (or ch 4 and join with a sl st to form a ring). Ch 3 (does count as a stitch), work 7 dc into the ring. Join with a sl st to the first dc. (8 dc)
Round 2 (Color A – Center)
Ch 3 (does count as a stitch). Work 2 dc in each stitch around. Join with a sl st to the first dc. (16 dc) Fasten off and cut yarn.
Round 3 (Color B – Petals Base)
Join Color B in any stitch. Ch 3 (counts as a stitch), work 2 dc in the same stitch, ch 1, skip next stitch. *Work 3 dc in the next stitch, ch 1, skip next stitch.* Repeat from * to * around. Join with a sl st to the top of the beginning ch-3. (8 clusters of 3 dc.) Do not cut the yarn; pull the loop to make it bigger and leave it. We will pick up the yarn and continue working here later.
Round 4 (Color C – Background Layer)
Change the color to the background color (Color C). Fasten the yarn in one of the stitches of round 2 that we skipped in the previous round. Tie a knot or use a slip stitch through a loop on the hook to add the new yarn color. On this round, push the stitches from round 3 away a bit. The stitches from round 4 will be worked in front of the round 3 stitches, and into the round 2 stitches.
Ch 3 (counts as one dc), ch 4, skip the 3dc cluster, and go into the space in round 2 and work a dc in round 2. * ch 4, skip the 3 dc cluster, work a dc into the next skipped stitch in rnd 2* Repeat from * to * all the way around. At the end, ch 4 and sl st into the 3 ch. Do not cut the yarn, but pull the loop to make it bigger and leave it. We will pick up the yarn and continue working here later.
Round 5 (Color B – Petal Layer 1)
Return to Color B. Insert your hook through any ch-4 space from Round 4 and pull up the working loop from Round 3. Make sure the loop is on the front of your work. Keep the ch-4 spaces from Round 4 pushed toward the back as you work. You will be working into the petal clusters from Round 3 and crocheting over the chains from round 4.
Ch 3 (counts as 1 dc), dc inc in the next dc, 1 dc in the next dc, ch 2, skip the dc from Round 4 behind the petal cluster. * 1 dc in the next dc, dc inc in the next dc, 1 dc in the next dc, ch 2, skip the next dc from Round 4.* Repeat from * to * around. End with ch 2 and join with a sl st to the top of the beginning ch 3. (8 clusters of 4 dc, 8 ch-2 spaces) Do not fasten off. Pull up the working loop to prevent unraveling. You will return to this round later.
Round 6 (Color C – Background Layer 2)
Return to color C from round 4. Pull the working loop from Round 4 to the front of your work so it sits in front of the ch-5 spaces. You will be working into the dc stitches from Round 4 while keeping the petal layer pushed toward the back.
Ch 3 (counts as 1 dc), work 1 dc in the same stitch, ch 5. Skip the next 4 dc from Round 5. *Work 2 dc in the next dc from Round 4, ch 5, skip the next 4 dc from Round 5.* Repeat from * to * around. End with ch 5 and join with a sl st to the top of the beginning ch 3. (16 dc, 8 ch-5 spaces)
Round 7 (Color B – Petal Layer 2)
Return to Color B. Insert your hook through any ch-5 space from Round 6 and pull up the working loop from Round 5 to the front of your work. You will be working into the stitches from Round 5 while keeping the ch-5 spaces from Round 6 pushed toward the back.
Ch 3 (counts as 1 dc). Work 2 dc in the next dc, 1 dc in each of the next 2 dc, ch 2. Skip the 2 dc from Round 6. *Work 1 dc in the next dc, 2 dc in the next dc, 1 dc in each of the next 2 dc, ch 2. Skip the next 2 dc from Round 6.* Repeat from * to * around. Join with a sl st to the top of the beginning ch 3. (8 clusters of 5 dc, 8 ch-2 spaces) Do not fasten off. Pull up the working loop to prevent unraveling. You will return to this round later.
Round 8 (Color B – Petal Tops)
Continue with Color B. This round forms the tops of the flower petals. Ch 1 (does not count as a stitch). Work 1 sc in the first dc (same as the ch 1), skip the next dc, work 5 dc in the next dc (center dc of the cluster), skip the next dc, work 1 sc in the next dc. *Ch 2, skip the ch-2 space from Round 7, work 1 sc in the first dc of the next cluster, skip the next dc, work 5 dc in the next dc, skip the next dc, work 1 sc in the last dc of the cluster.* Repeat from * to * around. End with ch 2 and join with a sl st to the first sc. (8 petal sections consisting of sc, 5 dc, sc) Fasten off and cut the yarn, leaving a 6–10 inch tail. Pull the yarn tail through the final loop and tighten.
Round 9 (Color B – Backing Petals)
Return to Color B. Pull the working loop from Round 7 to the front of your work. Insert your hook through any ch-5 space from Round 6 and pull up the working loop from Round 7. Ch 3 (counts as 1 dc). Work 2 dc in the next dc. Next, fold the flower petal from Round 8 forward to access the ch-2 space from Round 7 behind it. Work 5 dc in the ch-2 space from Round 7. Flip the petal back into place. Working in front of the stitches from Round 8, work 1 dc in the first dc and 2 dc in the next dc. Fold the next petal forward and work 5 dc in the ch-2 space behind the petal. Flip the petal back into place. Work 1 dc in the first dc and 2 dc in the next dc. Repeat from * to * around. Join with a sl st to the top of the beginning ch 3. (8 sections of 3 dc between the petals and 8 sections of 5 dc behind the petals) Do not fasten off.
Round 10 (Color B – Shaping the Square)
This round transforms the flower from a circle into a square. Ch 1 (does not count as a stitch). Work 1 sc in the first stitch and in each of the next 5 stitches. Work 1 hdc in the next stitch and 1 dc in the next stitch. Corner: Work (2 dc, ch 2, 2 dc) in the next stitch. Work 1 dc in the next stitch and 1 hdc in the next stitch. Work 1 sc in each of the next 11 stitches. Work 1 hdc in the next stitch and 1 dc in the next stitch. Corner: Work (2 dc, ch 2, 2 dc) in the next stitch. Work 1 dc in the next stitch and 1 hdc in the next stitch. Work 1 sc in each of the next 11 stitches. Work 1 hdc in the next stitch and 1 dc in the next stitch. Corner: Work (2 dc, ch 2, 2 dc) in the next stitch. Work 1 dc in the next stitch and 1 hdc in the next stitch. Work 1 sc in each of the last 5 stitches. Join with a sl st to the first sc. You should now have a square shape with 4 corners separated by ch-2 spaces.
Round 11 (Color C – Background Border)
Continue with Color C. Ch 1 (does not count as a stitch). Work 1 hdc in the first stitch and in each of the next 10 stitches. Corner: Work (2 dc, ch 2, 2 dc) in the corner ch-2 space. Work 1 hdc in each of the next 19 stitches. Corner: Work (2 dc, ch 2, 2 dc) in the corner ch-2 space. Work 1 hdc in each of the next 19 stitches. Corner: Work (2 dc, ch 2, 2 dc) in the corner ch-2 space. Work 1 hdc in each of the next 19 stitches. Corner: Work (2 dc, ch 2, 2 dc) in the corner ch-2 space. Work 1 hdc in each of the last 9 stitches. Join with a sl st to the first hdc. Fasten off and cut the yarn, leaving a 6–10 inch tail. Pull the yarn tail through the final loop and tighten.
Assembly
Weave in all ends securely using a yarn needle. For a seamless look, consider using a join-as-you-go method if you are creating a larger project like a crochet top or a blanket.
Tips
- Weaving Ends: With a granny square, you’ll have quite a few ends, one per color change per square! I recommend using a yarn needle to weave each end in opposite directions (forward a few stitches, then back) for added security. Some crocheters prefer to crochet over the tails as they go to reduce finishing time.
- Color Planning: A neutral background color unifies different flower combinations beautifully.
FAQ
Can I use a different yarn weight?
Yes! This pattern works well in any weight, just adjust your hook accordingly. With chunky yarn, you’ll get a much larger, cozier square; with fingering weight, you’ll get a delicate, miniature version. Your finished size will vary from the 17 × 17 cm given above.
What does “magic ring” mean?
A magic ring (also called a magic circle or adjustable ring) is a way to start a crochet project in the round so there is no hole in the center. It is easier than it sounds and creates a tight center for your flower.
Can I use a different join method for a blanket?
Absolutely. I love join-as-you-go for larger projects, as it saves the finishing step, but a flat slip-stitch join, a flat single-crochet join, or even a decorative “granny join” all look great. The join you choose will slightly affect the overall look and drape of your finished project.
How do I weave in ends neatly?
With a granny square, you’ll have quite a few ends, one per color change per square! I recommend using a yarn needle to weave each end in opposite directions (forward a few stitches, then back) for added security. Some crocheters prefer to crochet over the tails as they go to reduce finishing time.
What can I make with these squares?
The possibilities are endless. You can make blankets, totes, cardigans, cushion covers, wall art, or coasters. For inspiration on using squares in garments, check out our boho crochet top patterns.
Pin This Crochet Pattern!