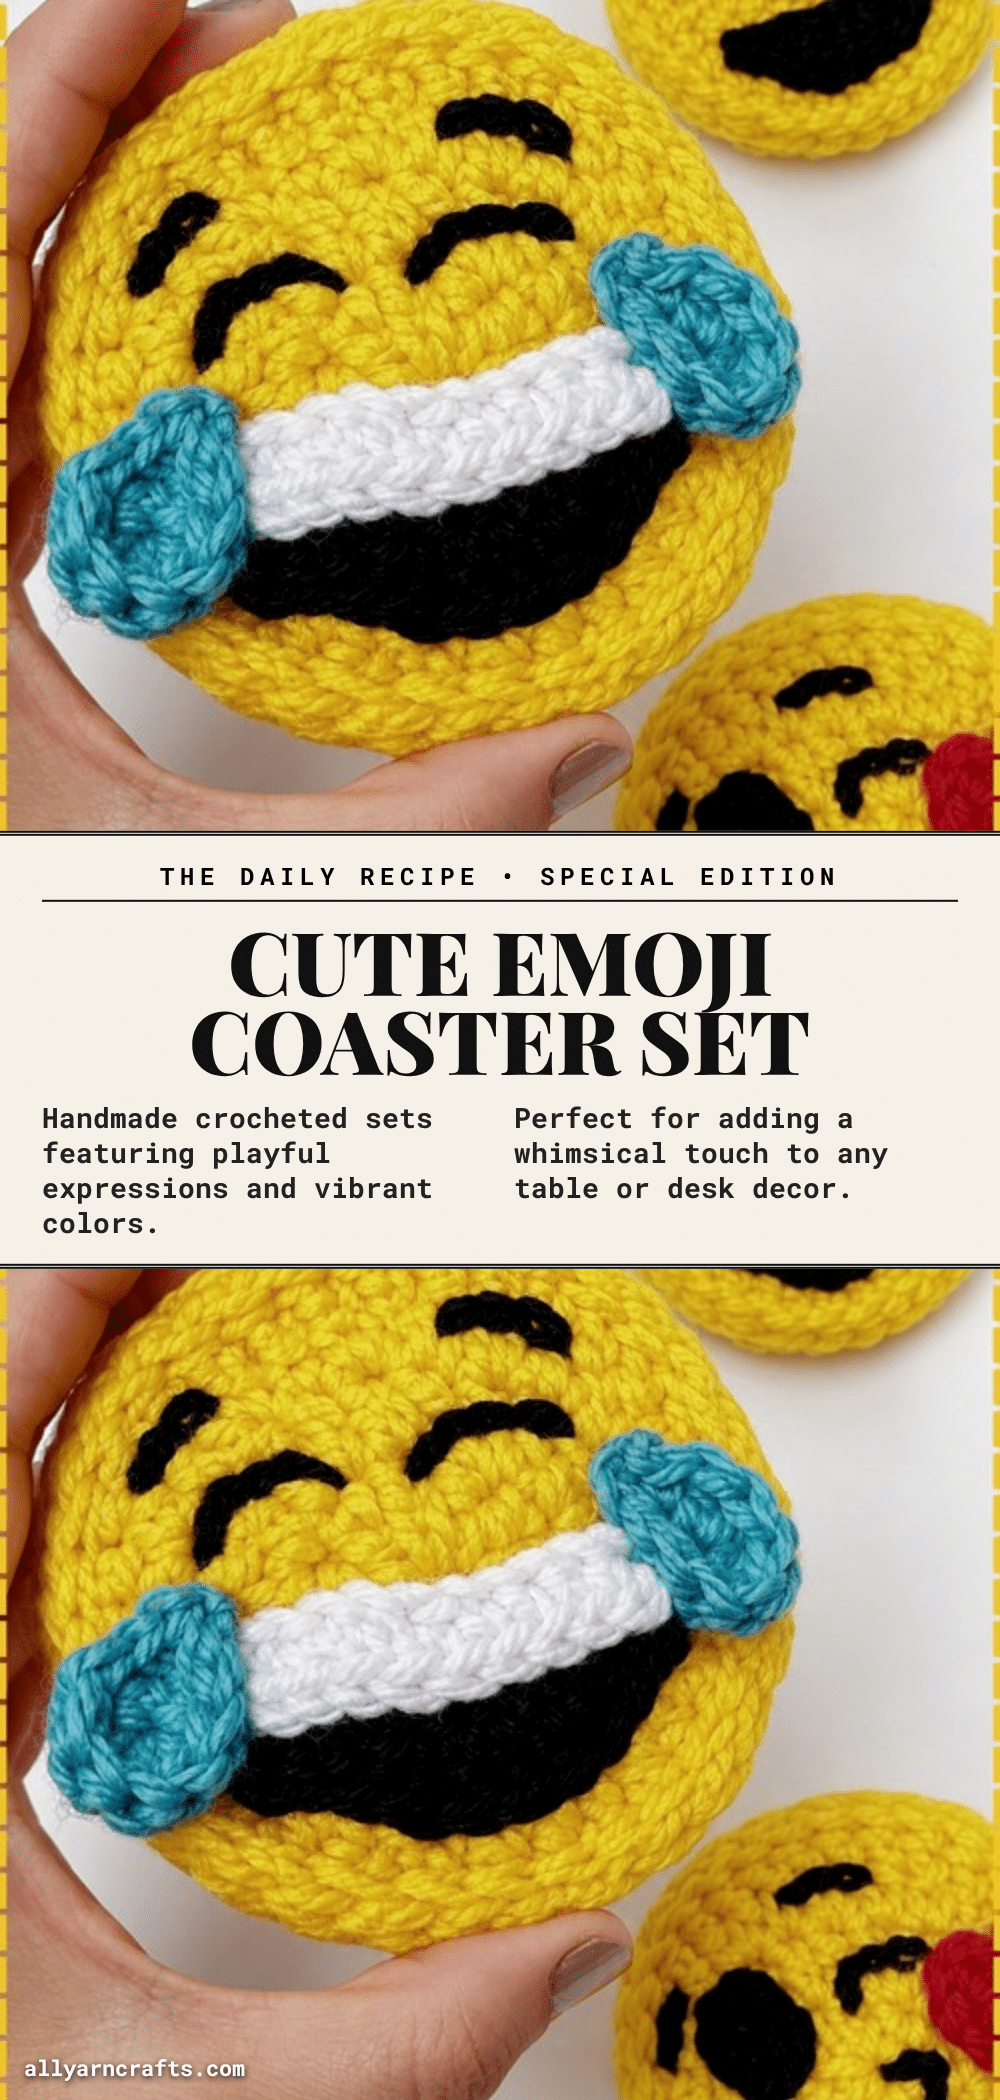
These cute crochet emoji coasters are the perfect way to add a pop of personality to your coffee table or kitchen counter. Whether you are looking for a quick handmade gift for a friend, a fun project for a craft night, or a cheerful addition to your own home decor, this double-layer yellow coaster set is an excellent choice. They are sturdy enough to protect your surfaces from condensation while bringing a smile to anyone who uses them.
Our Touch
What makes this project stand out is the clever construction method. Instead of relying on embroidery for the expressions, which can sometimes look flat or wear down with washing, these coasters use surface-applied pieces. This technique gives the emojis a dimensional, tactile quality that is incredibly satisfying to touch. The double-layer construction not only adds durability but also allows for a tiny bit of padding, making them feel substantial and high-quality in your hands. Choosing cotton yarn is essential here; it provides the necessary stitch definition to make the geometric shapes like sunglasses and hearts pop, while also offering the absorbency needed to handle wet glasses effectively.
Project Overview
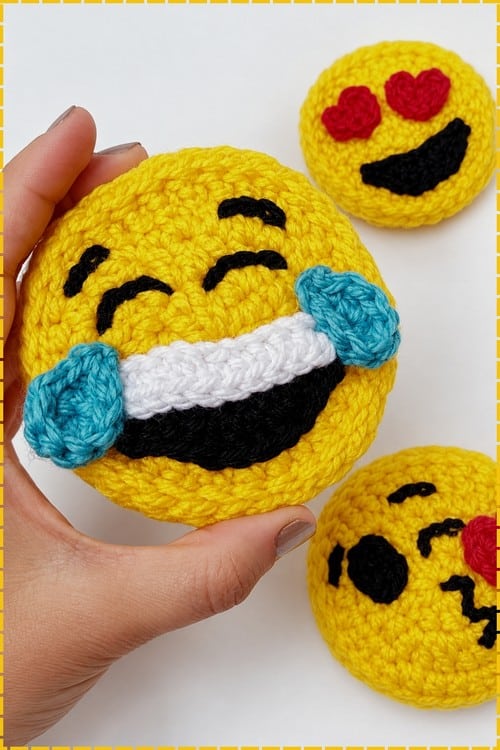
This pattern creates a set of flat, round emoji coasters using a double-layer construction. The base is worked in joined rounds to ensure a perfectly flat surface, and facial features are created as separate pieces or surface stitches rather than traditional embroidery. The project is suitable for beginners who can work a flat circle, and the finished size is approximately 9 to 11 cm, making it ideal for standard mugs.
Materials
- Yellow yarn: For the emoji base (roughly 25 to 35 g per coaster)
- Black yarn: For details
- Red yarn: For hearts and mouths
- White yarn: For teeth
- Blue yarn: For tears
- 5 mm crochet hook: For the base
- 3.5 mm crochet hook: For the decorations
- Yarn needle
- Scissors
- Pins
- Optional: Magnet backing
- Optional: Fiberfill stuffing (a very small amount)
Gauge and Finished Size
The finished diameter sits somewhere around 9 to 11 cm at this hook size, which is about right for a mug. This is an estimate rather than a strict measured figure, as tension can vary.
Abbreviations
- SC: single crochet
- DC: double crochet
- SS: slip stitch
- CH: chain
- INC: increase, two stitches in the same stitch
Pattern Notes
Each coaster is a flat round with the face built from surface pieces rather than embroidery. The set works up as simple circles in the round, then every facial piece is made separately and stitched down. The base is worked in joined rounds, not spirals, with a chain 2 at the start and a slip stitch closed at the end of each round. The disc uses ten stitches in the first round rather than the usual twelve, which sets the increase step for the rounds above and keeps the circle flat.
The disc should lie completely flat on the table. A ruffled edge means the increases were worked too loosely, and a cupped centre means too tightly. Neither improves once the two layers are joined, so fix it now. If you are new to reading amigurumi patterns, you can follow along with video tutorials while keeping the written pattern handy as a reference.
Pattern Instructions
Emoji Face Base
The base is worked in joined rounds, not spirals. Chain 2 at the start and slip stitch closed at the end of each one.
- Row 1: Make a magic slip knot and chain 2. Work 10 DC into the central ring. Join with a slip stitch to the top of the first stitch [10]. Ten rather than the usual twelve is what sets the increase step for the rounds above and keeps the circle flat.
- Row 2: Chain 2, then 2 DC in each stitch around. Join with a slip stitch [20].
- Row 3: Chain 2, then 1 DC, 1 increase, repeat around. Join with a slip stitch [30].
The disc should lie completely flat on the table. A ruffled edge means the increases were worked too loosely, and a cupped centre means too tightly. Neither improves once the two layers are joined, so fix it now. Make a second identical circle for the back. Place the two circles wrong sides together with the edges lined up. Slip stitch or sew around the edge to join. Work the join evenly or the coaster will pull into an oval. Add light stuffing before closing if you want a padded coaster.
Heart Eyes
- Eyes: Make 2 small hearts using red yarn. No stitch instructions are given for these. See the Pattern Note. Attach by pulling the yarn tails through the face, then sew securely in place. Position the hearts slightly above the centre line of the face.
- Mouth: Chain 11. Starting in the second chain from the hook, work 1 SC, 1 SC, 6 DC, 2 SC [10]. The strip should curve on its own, with the taller stitches bowing the centre downward. If it lies straight, your double crochets are too short. Sew the mouth onto the face in a curve.
Sunglasses
- Glasses: Chain 16. Row 1: 1 SC in the second chain from the hook, then 1 SC, 4 DC, 3 SC, 4 DC, 2 SC [15]. Row 2: Chain 1 and turn, then 2 SS, 4 SC, 3 SS, 4 SC, 2 SS [15]. The two tall blocks are the lenses and the short section between them is the bridge. Held up, the piece should show a clear dip in the middle rather than reading as a straight bar. Fasten off and sew to the face.
- Mouth: Work slip stitches directly onto the face to create a curved smile. Working straight onto the fabric lets you set the exact curve, so mark it with pins first.
Crying Laughing
- Mouth, row 1: Chain 11, then starting in the second chain from the hook work 1 SC, 1 SC, 6 DC, 2 SC [10].
- Mouth, row 2: Chain 1 and turn, then 2 SS, 1 SC, 4 DC, 1 SC, 2 SS [10]. Two rows gives the mouth depth so it reads as open rather than as a line. It should hold a shallow bowl shape when you lay it down. Sew the mouth onto the face.
- Teeth: Chain 11, then 1 SC in the second chain from the hook and SC across [10]. Sew the teeth inside the mouth, sitting slightly toward the top of the opening.
- Tears: Chain 4. Starting in the second chain from the hook, work 1 SS, 1 SC, then 6 DC in the last chain. Mirror back down the other side of the chain with 1 SC, 1 SS. The cluster of six double crochets fans into the rounded bottom of the drop while the slip stitch end stays narrow. If it comes out symmetrical rather than teardrop shaped, the six stitches are being spread across more than one chain. Make a second tear and attach one to each side of the face. Note that no eyes are given for this design. See the Pattern Note.
Blowing a Kiss
- Winking eye: Worked into a ring: 1 DC, 2 SC, 2 DC, 2 SC, 1 DC [8]. Join with a slip stitch. The mix of stitch heights makes one side of the ring taller than the other, which is what gives the closed eye its curve. Sew it on with the tall side up. Sew onto the face.
- Heart: Add a small red heart near the mouth. No stitch instructions are given. See the Pattern Note.
- Mouth: Create a kissy mouth shape with red yarn. No stitch instructions are given for this either. Secure all pieces firmly.
Pattern Note
The base is sound. Ten double crochets doubling to twenty and then to thirty is a correct flat circle progression, and every decoration piece with written stitches accounts for its chain exactly. Chain 11 gives ten working stitches and each mouth uses ten. Chain 16 gives fifteen and both rows of the glasses use fifteen. Nothing is miscounted anywhere.
What is missing is four pieces:
- The hearts: They have no pattern. They appear twice, as the eyes on one design and as the kiss on another, and both times the instruction is only to make a small heart in red yarn. You will need a heart pattern from elsewhere, or you can cut and stitch small felt hearts instead, which on a coaster this size holds up better than a tiny crocheted one anyway.
- The kissy mouth: Has no pattern. Same situation. The instruction is to create a kissy mouth shape with red yarn and nothing more. Embroidering it directly onto the face with satin stitch is the simplest route and gives you a cleaner shape than a crocheted piece at that scale.
- The crying laughing design: Has no eyes. It gives you a mouth, teeth and tears, then stops. The expression needs closed curved eyes above the tears. Work them as slip stitches directly onto the face in black, the same way the sunglasses design does its mouth.
- The blowing a kiss design: Gives only one eye. The winking one. The open eye on the other side is never covered. A small black circle or a few satin stitches will do it.
Two smaller things: The tear instruction is written once but you need two, one for each side. And the base is labelled with rows when it is worked in joined rounds, which is only a naming quirk but can confuse you when you are counting.
Assembly
There are no safety eyes anywhere in this pattern and that is the right call for a coaster. Every feature is sewn or stitched on. If you do want to use safety eyes on a face, the timing is unusual and worth understanding. The post pushes through the front circle and the washer seats on the back of it, which means the eye has to go in before the two circles are joined. Once the sandwich is closed there is no room for a washer between the layers, and forcing one in leaves a lump the coaster will rock on. Insert them into the front circle after round 3, before joining. For anything a child under three will handle, skip them entirely and embroider, and leave the magnet backing off as well, since a loose magnet is a far more serious hazard than a loose eye.
For placement and sewing:
- Fold the coaster in half vertically to find the centre line and mark it with a pin. Everything else is measured off that.
- Place the eyes first, then the mouth underneath them. Getting the mouth in before the eyes is how faces end up crowded at the bottom.
- Pin every piece and look at the coaster from a metre away before you sew. Expression is judged at distance, not up close.
- Sew with small whip stitches in matching yarn. Stitch through the front layer only where you can, so nothing shows on the back. This matters more here than on most projects, since the back is a usable face too.
- Secure the tails inside the coaster between the layers before trimming.
For padding, if you want it:
- Use a very small amount of stuffing between the layers and spread it thin. Too much and the coaster domes upward, which makes a mug sit unevenly on it. Skip padding entirely on any coaster that will actually hold a drink. A flat coaster is a better coaster.
- If you are adding magnet backing instead, do that before joining the edge so the magnet sits between the layers.
Tips
- That placement step is where the expression comes from, so pinning before sewing helps.
- The disc should lie completely flat on the table. A ruffled edge means the increases were worked too loosely, and a cupped centre means too tightly. Neither improves once the two layers are joined, so fix it now.
- The strip should curve on its own, with the taller stitches bowing the centre downward. If it lies straight, your double crochets are too short.
- Held up, the piece should show a clear dip in the middle rather than reading as a straight bar.
- Working straight onto the fabric lets you set the exact curve, so mark it with pins first.
- Two rows gives the mouth depth so it reads as open rather than as a line. It should hold a shallow bowl shape when you lay it down.
- The cluster of six double crochets fans into the rounded bottom of the drop while the slip stitch end stays narrow. If it comes out symmetrical rather than teardrop shaped, the six stitches are being spread across more than one chain.
- The mix of stitch heights makes one side of the ring taller than the other, which is what gives the closed eye its curve.
- For anything a child under three will handle, skip them entirely and embroider, and leave the magnet backing off as well, since a loose magnet is a far more serious hazard than a loose eye.
- Place the eyes first, then the mouth underneath them. Getting the mouth in before the eyes is how faces end up crowded at the bottom.
- Pin every piece and look at the coaster from a metre away before you sew. Expression is judged at distance, not up close.
- Sew with small whip stitches in matching yarn. Stitch through the front layer only where you can, so nothing shows on the back. This matters more here than on most projects, since the back is a usable face too.
- Secure the tails inside the coaster between the layers before trimming.
- For padding, if you want it: Use a very small amount of stuffing between the layers and spread it thin. Too much and the coaster domes upward, which makes a mug sit unevenly on it. Skip padding entirely on any coaster that will actually hold a drink. A flat coaster is a better coaster.
- If you are adding magnet backing instead, do that before joining the edge so the magnet sits between the layers.
- Yes, keep going with the same increase step. Round 4 would be 2 DC then an increase for 40, round 5 three DC then an increase for 50. Anything past 40 gets wide for a coaster but works well as a trivet.
- Your increases are too loose for the yarn. Drop to a 4.5 mm hook and try again. A ruffled circle will not flatten out once joined, and two ruffled circles sewn together makes it worse.
- Cotton, and not by a small margin. Acrylic flattens and goes shiny where a mug sits, and it does not absorb condensation. Cotton also gives the flat circle better stitch definition.
FAQs
Can I use acrylic yarn for these coasters?
While you can use acrylic, cotton is highly recommended. Acrylic tends to flatten and go shiny where a mug sits, and it does not absorb condensation. Cotton also gives the flat circle better stitch definition.
How do I fix a ruffled edge on my coaster base?
A ruffled edge means your increases were worked too loosely. You should fix this now, as it will not improve once the two layers are joined. Try dropping to a smaller hook (e.g., 4.5 mm) and tightening your tension.
What if I want to add safety eyes?
If you choose to use safety eyes, they must be inserted into the front circle after round 3, before joining the two layers. Once the sandwich is closed, there is no room for a washer between the layers, and forcing one in creates a lump that will make the coaster rock.
How do I make the hearts for the Heart Eyes design?
The pattern does not provide a specific stitch count for the hearts. You can find a small heart crochet pattern online, or simply cut and stitch small felt hearts, which hold up better on a coaster of this size than tiny crocheted ones.
Why does the Crying Laughing coaster need extra eyes?
The written pattern for the Crying Laughing design stops after the mouth, teeth, and tears. To complete the expression, you need to work closed curved eyes above the tears using black slip stitches directly onto the face.
Pin This Crochet Pattern!