There is something deeply satisfying about the way a well-placed stitch transforms a simple shape into a character with personality. It is not just about the rows or rounds you have completed, but the tiny, deliberate details that make you want to keep going—the curve of a smile, the tilt of a head, or the specific texture of a face that tells a story. When you are working on amigurumi, the eyes are the anchor of that expression. While safety eyes are convenient, nothing compares to the softness and nuance of embroidered faces, especially when you want to create a sleepy, peaceful look that is safer for little ones. This guide focuses on the art of surface embroidery, turning your finished stuffed heads into expressive characters using just yarn and a needle.
Texture and Stitch Notes
Embroidered eyes offer a tactile warmth that plastic components simply cannot match. When you choose to stitch your eyes, you are working with the texture of the yarn against the fabric of the crochet stitches. This method is particularly effective on chunky yarns like chenille, where the softness of the material enhances the gentle curves of a closed eye or the roundness of a pupil. The “sleepy” aesthetic relies on the tension of the thread; a slightly looser weave creates a relaxed, dreamy look, while tighter stitches provide a more alert, wide-eyed appearance. By controlling the stitch length and the spacing between the black and white threads, you can manipulate the visual weight of the eye, making it appear larger or more intimate. This approach allows for a level of customization that fits perfectly with the cozy, handmade appeal of projects like the cute crochet amigurumi bunny, where a soft, embroidered face enhances the overall cuddly factor.
Project Overview
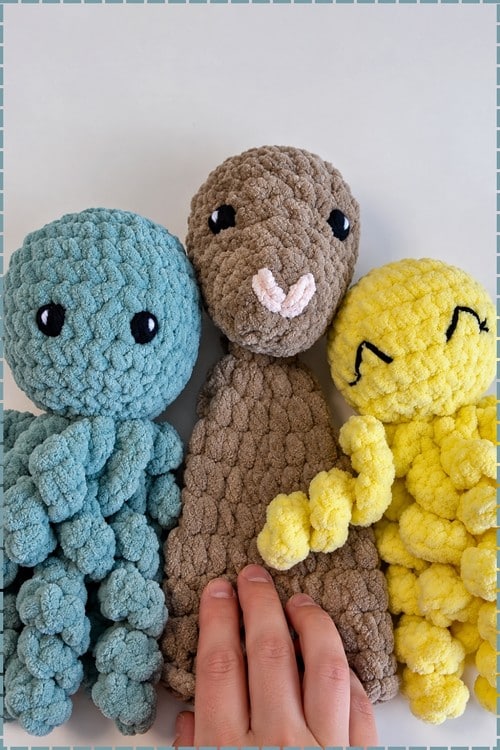
This guide is a technique reference for embroidering eyes onto a finished, stuffed amigurumi head. It is not a construction pattern for a specific toy, meaning there are no rounds, no stitch counts, and no pieces to construct. The focus is entirely on replacing safety eyes with embroidered ones that are safer for young children and more expressive on small faces. The techniques described here can be applied to any amigurumi project, from tiny keychains to large plushies.
Materials
- Black yarn: 4 weight acrylic or cotton for all three eye methods.
- White yarn: For the twinkle highlight in methods 2 and 3.
- Needle: Metal tapestry needle with a blunt tip.
- Markers: Safety pins for marking eye placement.
- Tools: Scissors.
Abbreviations
As this is an embroidery guide rather than a crochet pattern, standard crochet abbreviations do not apply. The instructions rely on visual placement and needle movement.
Pattern Notes
This guide works on any finished amigurumi head. It is essential to have the head fully stuffed and closed before starting. Loose or underfilled heads cause embroidery stitches to sink into the fabric and distort the shape. Firm stuffing is required to maintain the integrity of the eye design.
Before You Start
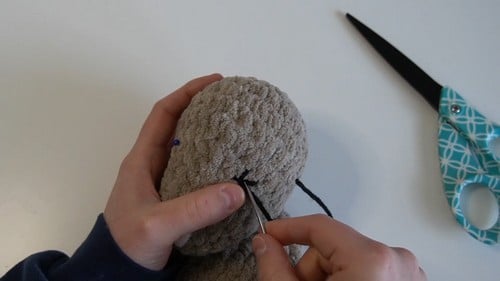
Mark both eye positions with safety pins before stitching anything. It is critical to mark both eyes, not just the first one. This step prevents the most common failure: asymmetric placement that only becomes obvious after the second eye is already committed. Step back from the head and look at it from arm’s length after pinning. The face reads differently at a distance than it does in your hand. Adjust the pins before you pick up the needle.
The Methods
Method 1 — Closed Sleepy Eye
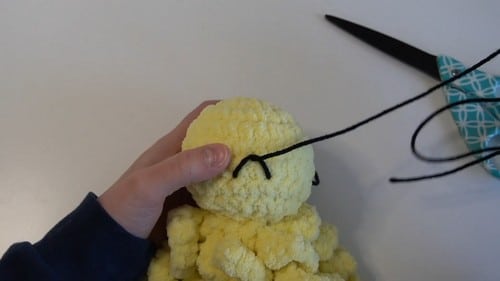
This method creates a relaxed, half-closed look that suits small round characters like cats, bears, or bunnies.
- Use safety pins to mark four points: the outer corner and inner corner of the first eye, and the inner and outer corner of the second eye, leaving 2 to 3 stitches for each eye width.
- Insert the needle from the back of the head and bring it out at the first pin of one eye, leaving a tail at the back for tying off later.
- Checkpoint: The needle exit point is where the eye corner will sit. Step back and look at this position from the front before continuing. Adjust the pin if it does not look right.
- Insert the needle into the second pin of the same eye (the other corner).
- Before pulling the yarn tight, bring the needle out one row directly above the centre of the two base points. This third point creates the top of the triangular curve.
- Loop the yarn over the needle and pull through to create the curved eye shape.
- Insert the needle back into the same top hole, going over the yarn to lock the stitch.
- Optional eyelashes: Bring the needle out at the starting corner and work two small diagonal stitches, approximately one stitch apart.
- Move to the second eye and repeat the same steps in reverse to mirror the first eye.
- Checkpoint: Hold the head at arm’s length and compare both eyes. The curve of each arc should be the same depth. If one looks flatter than the other, the anchor point was placed differently. Adjust before tying off.
Method 2 — Simple Open Whip Stitch Eye
This versatile method creates a classic wide-awake oval expression.
- Mark the centre of each eye position using safety pins, choosing a natural gap between crochet stitches.
- Insert the needle from the back of the head and bring it out at the bottom of the selected stitch position.
- Checkpoint: This first exit point is the base of the eye. It should sit slightly above the horizontal midline of the face, not at the centre.
- Insert the needle back into the top of the same stitch to create one whip stitch.
- Repeat this whip stitch 6 to 9 times through the same two holes to build thickness.
- As stitches accumulate, gently spread them outward to create an oval shape rather than letting them stack into a round blob.
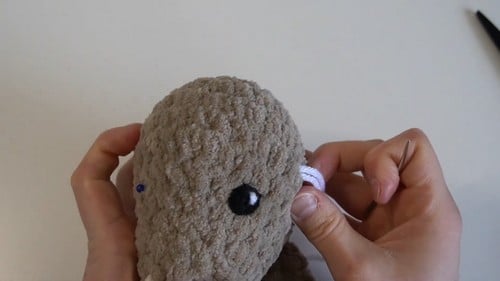
- Thread white yarn onto the needle and bring it out on the upper portion of the black oval.
- Create a small vertical stitch approximately three-quarters of the way down the eye to form the twinkle highlight.
- When tying off, pass the needle through the white highlight stitch before knotting at the back. This keeps the highlight visible and prevents it from sinking.
- Repeat for the second eye.
- Checkpoint: The two ovals should be the same height and the same width. A slight difference in stitch count creates a visible size difference at this scale. Count your whip stitches on the first eye and match that count on the second.
Method 3 — Circular Wagon Wheel Eye
This method produces a defined, round pupil effect.
- Mark the centre point of each eye position with a safety pin.
- Insert the needle from the back of the head and bring it out at the exact centre of the first eye position.
- Create a five-point star with black yarn, similar to an asterisk. The size of this star determines the final size of the eye.
- Checkpoint: The star spokes should be evenly spaced. Hold the head at arm’s length. If one spoke is noticeably longer than the others, the eye will look lopsided. Adjust before weaving.
- Bring the needle out near the centre of the star.
- Begin weaving the yarn over and under the star spokes in a circular motion, working outward from the centre without piercing the crochet fabric.
- Continue weaving until the spokes are completely covered and a solid circle has formed.
- Insert the needle through the edge of the circle and bring it out through the back of the head.
- Add a small white stitch on the upper corner of the circle for the twinkle highlight.
- Repeat for the second eye.
- Checkpoint: Lay the two completed wagon wheel eyes side by side with the head facing you. They should be the same diameter. If one is larger, that spoke was longer. Accept it or unpick and rebuild the star with shorter spokes.
Assembly
Complete one eye fully before starting the second, including tying off and burying the tails. Then, recreate the second eye while comparing both sides constantly. Use pins again when positioning the second eye if the spacing felt unclear on the first. The order matters: finish, evaluate, then replicate. Trying to work both eyes simultaneously produces neither well.
After completing both eyes, exit the needle at the same hole where the yarn originally entered. Tie two firm knots at the back of the head. Use the needle tip or the blunt end of a crochet hook to push the knot and yarn tails deep into the stuffing until they are completely hidden. Check the eye from the front after burying the tail, as the act of pushing the knot inward can shift the outermost stitch slightly.
Tips
- Pinning is Key: The most important step in all three methods is placing both pins before you pick up the needle. Asymmetric eyes are the most common dissatisfaction with embroidered faces, and it is almost always caused by pinning one eye at a time.
- Consistent Holes: For Method 2, use the same two holes every time. Every pass of the whip stitch goes through the bottom hole and the top hole only. Using slightly different holes on each pass creates ragged, uneven edges.
- Manage Tension: For Method 3, keep the weaving yarn slightly looser than feels right. Tension tightens as the circle fills in. Starting too tight collapses the circle into an oval by the time you finish.
FAQs
Can I use this embroidery technique on any amigurumi?
Yes, this guide works on any finished amigurumi head. However, the head must be fully stuffed and closed before you begin to prevent the stitches from sinking.
What yarn weight is best for embroidered eyes?
Black yarn in 4 weight acrylic or cotton works well for all three methods. For the highlight, white yarn is standard, though pale yellow or cream can be used for different effects.
How do I prevent my embroidered eyes from looking uneven?
The most common cause of uneven eyes is pinning them one at a time. Always mark both positions with safety pins before stitching. Additionally, step back and view the head from arm’s length to check symmetry.
Is embroidered eye safer than safety eyes?
Yes, embroidered eyes are a safer alternative for toys intended for young children, as they cannot be pulled off and swallowed like plastic safety eyes.
How do I add a highlight to the sleepy eye (Method 1)?
Method 1 typically creates a closed eye without a visible pupil. If you wish to add a highlight, you can use a tiny white stitch near the corner, but the design is primarily focused on the curved lash line.
What if I make a mistake while weaving the Wagon Wheel eye?
If the spokes are uneven or the circle is lopsided, you can unpick the weaving and rebuild the star. Ensure the spokes are evenly spaced before you begin the circular weaving process.
Pin This Crochet Pattern!