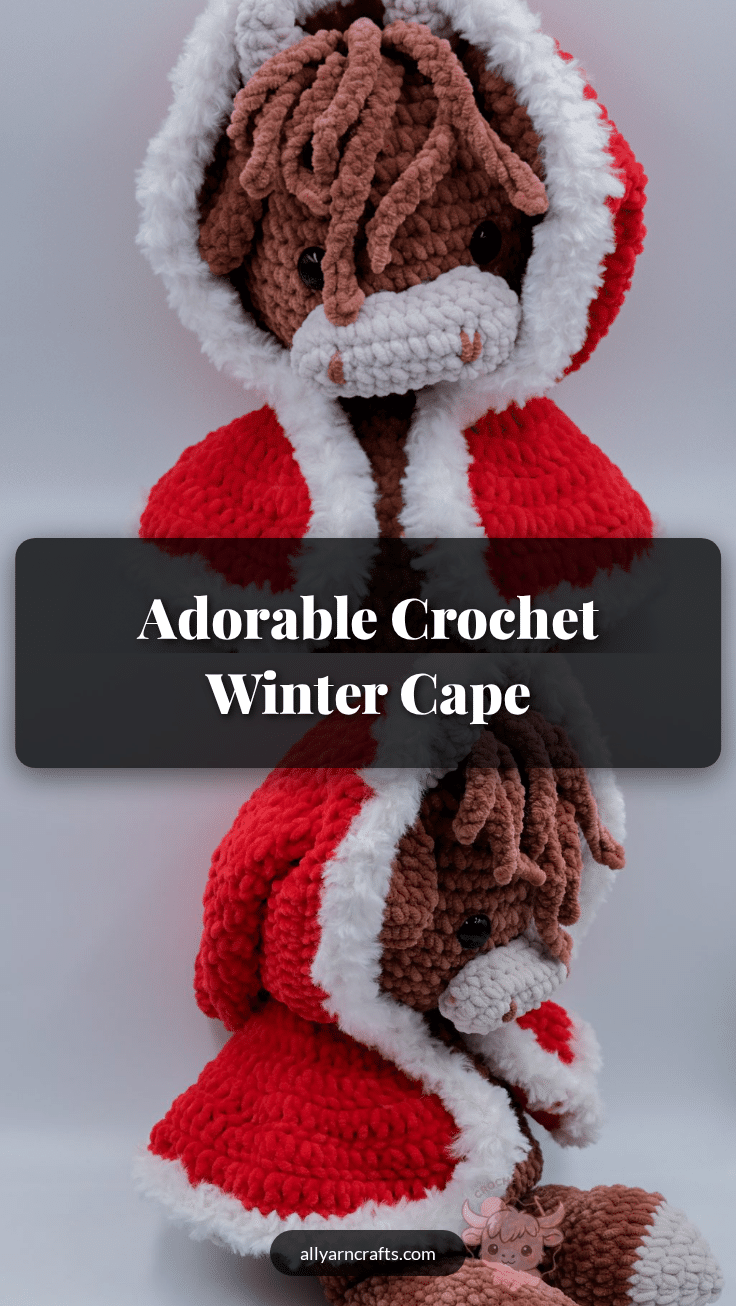
There is something undeniably magical about the way a crochet project takes shape, row by row, as the fabric grows under your hands. This adorable winter cape for amigurumi captures that joy perfectly, blending structured shaping with the soft, inviting texture of chenille and fur yarns. The pattern relies on the satisfying rhythm of double crochet increases to create a beautiful flare, while the hood construction offers a clever twist on traditional shaping. It is a project that rewards patience with a whimsical result, perfect for dressing up a beloved plush friend or even adapting for a cozy human-sized accessory.
Texture and Stitch Notes
The visual appeal of this cape lies in the interplay between the smooth, solid body of the double crochet rows and the plush, tactile quality of the fur yarn trim. Chenille yarn is an excellent choice for the main body because it creates a dense, warm fabric that holds its shape well on a plush toy. The transition from the structured, flared cape to the gathered hood creates a delightful silhouette. Pay close attention to the decrease rounds in the hood; working without the chain-2 turn at the end of these rounds is a crucial detail that prevents unsightly gaps, ensuring the hood remains snug and seamless.
Project Overview
This pattern provides instructions for creating a winter cape designed for a medium-sized plush toy, such as the Highland Cow “Fergus.” The cape is worked in rows from the neckline down, utilizing increases to create a flared shape. The hood is constructed separately as a rectangle, joined at the sides, and then shaped with decreases to fit over the toy’s head. The pattern includes instructions for adding an optional festive trim using a contrasting fur yarn. While designed for amigurumi, the structure allows for easy adaptation to human sizes.
Materials
- Yarn Color A (Primary color, e.g., Red): Approximately 150 g
- Yarn Color B (Fur yarn): Approximately 50 g
- 4.5 mm crochet hook
- Scissors
- Tapestry needle
Note: While chenille is featured, other yarns like cotton or acrylic can be used. Always select a hook size that fits your chosen yarn.
Gauge and Finished Size
Specific gauge measurements are not provided for this pattern. The finished size is intended for a medium-sized plush toy (such as Fergus the Highland Cow). The dimensions can be adjusted by altering the foundation chain for width or adding more rows for length.
Abbreviations
Abbreviations are in US terms:
- ch: chain
- rnd: round
- st(s): stitches
- inc: increase
- dc2tog: Double crochet decrease
- sc: single crochet
- dc: double crochet
- sl st: slip stitch
- fo: fasten off
Pattern Notes
The cape is worked in rows from the neckline down, increasing each row to create a flared shape. The hood is made separately, attached to the cape, and then shaped with decreases. Optional white trim can be added around the edges for a festive look. For sizing adjustments, see the Sizing and Adjustments section below.
Pattern Instructions
Cape
Color A
Row 1: ch 29, 1 sc in 2nd ch from hook and in each ch. ch 2, turn. (28 sc)
Switch to DC from here.
Row 2: (1 dc, dc inc) rep across. ch 2, turn. (42 dc)
Row 3: (2 dc, dc inc) rep across. ch 2, turn. (56 dc)
Row 4: (3 dc, dc inc) rep across. ch 2, turn. (70 dc)
Row 5: (4 dc, dc inc) rep across. ch 2, turn. (84 dc)
Row 6: (5 dc, dc inc) rep across. ch 2, turn. (98 dc)
Hood Base
In color A
The hood is made of a rectangle worked in rows.
Row 1: Ch 60, 1 dc in the 2. ch from the hook and in each st (58 dc)
Row 2-7: 1 dc in each st, ch 2 turn (58 dc)
Do not fasten off.
Fold the rectangle in half. Sl st in the next st. (we are skipping one)
Then sl st into the opposite side of the second stitch. (skip the first one on the other side too). You will now work in rounds, shaping the hood.
We skipped 2 stitches, so now you should have 56. We are going to attach the hood to the cape with those skipped stitches.
Extra Help: After the rows on the hood are finished, do not cut the yarn. Sl st one time. Fold the rectangle and sl st into the opposite side. Now the sides are joined, and the rest of the hood is made in rounds. Continue working the rounds for the hood. We do not ch 2 on the decrease rounds here because that will create gaps.
Hood Shaping
Rnd 1: 1 dc in each st (56 sc)
Rnd 2: (6 dc, dc2tog) x 7 (49 dc)
Rnd 3: (5 dc, dc2tog) x 7 (42 dc)
Rnd 4: (4 dc, dc2tog) x 7 (35 dc)
Rnd 5: (3 dc, dc2tog) x 7 (28 dc)
Rnd 7: (2 dc, dc2tog) x 7 (21 dc)
Rnd 8: (1 dc, dc2tog) x 7 (14 dc)
Rnd 9: dc2tog x 7, rep across (7 dc)
Fasten off. Sew the hole closed.
Trim
(Color B – Fur Yarn)
With RS facing, join Color B to the bottom corner of the cape.
Work 1 sc in each st evenly around the entire outer edge of the cape.
Optional: add 1 extra sc at outer corners to avoid curling.
Fasten off and weave in ends.
Do the same for the face opening.
FO and weave in all ends.
Assembly
Sew the hood to the cape. Begin by lining up the open edge of the hood with the cape’s neckline, ensuring the stitches match evenly along both pieces. Once everything is aligned, use your yarn needle to sew the hood securely to the cape, working stitch by stitch to create a neat and even seam.
Tips
- Double Crochet Decrease (dc2tog): Yarn over, insert hook into next stitch, pull up a loop (3 loops on hook). Yarn over, pull through 2 loops. Yarn over, insert hook into next stitch, pull up a loop (4 loops on hook). Yarn over, pull through 2 loops. Yarn over, pull through all 3 loops.
- Sizing Adjustments: This pattern is written for a medium-sized plush toy, but it’s very easy to adapt. If you want a wider cape, simply increase the number of stitches in your foundation chain. For extra length, work more dc rows before adding the trim.
- Human-Sized Version: To make a human-sized version, measure around the shoulders, create a cape base using double crochet rows, and follow the same increase structure used in the pattern. The hood can be adjusted by extending the rectangle and shaping the decreases at the back.
FAQs
Can I make this cape for an adult?
Yes. To create a human-sized version, measure around the shoulders to determine the width. Create a cape base using double crochet rows following the same increase structure (adding one stitch per row) as the toy version. You can also extend the hood rectangle for extra coverage.
What yarn is best for the fur trim?
The pattern suggests a fur yarn for the trim to give a festive, textured look. However, you can use any yarn that fits your hook, such as a plush acrylic or chenille, to achieve a similar soft finish.
Why do I not chain 2 in the hood decrease rounds?
Chaining 2 at the end of the decrease rounds would create gaps in the fabric. By working directly into the first stitch of the round without a turning chain, you ensure the hood remains tight and seamless.
How do I adjust the width of the cape?
The width is determined by the foundation chain in Row 1. To make the cape wider, simply increase the number of chains in the foundation chain and adjust the stitch counts in subsequent rows accordingly.
Can I use this pattern for other amigurumi?
Absolutely. While designed for a medium-sized toy like Fergus the Highland Cow, the sizing can be easily scaled up or down by adjusting the foundation chain and the number of rows worked.
If you enjoyed this cape pattern, you might also like our easy crochet top pattern for beginners or check out our pattern page for more creative ideas.
Pin This Crochet Pattern!