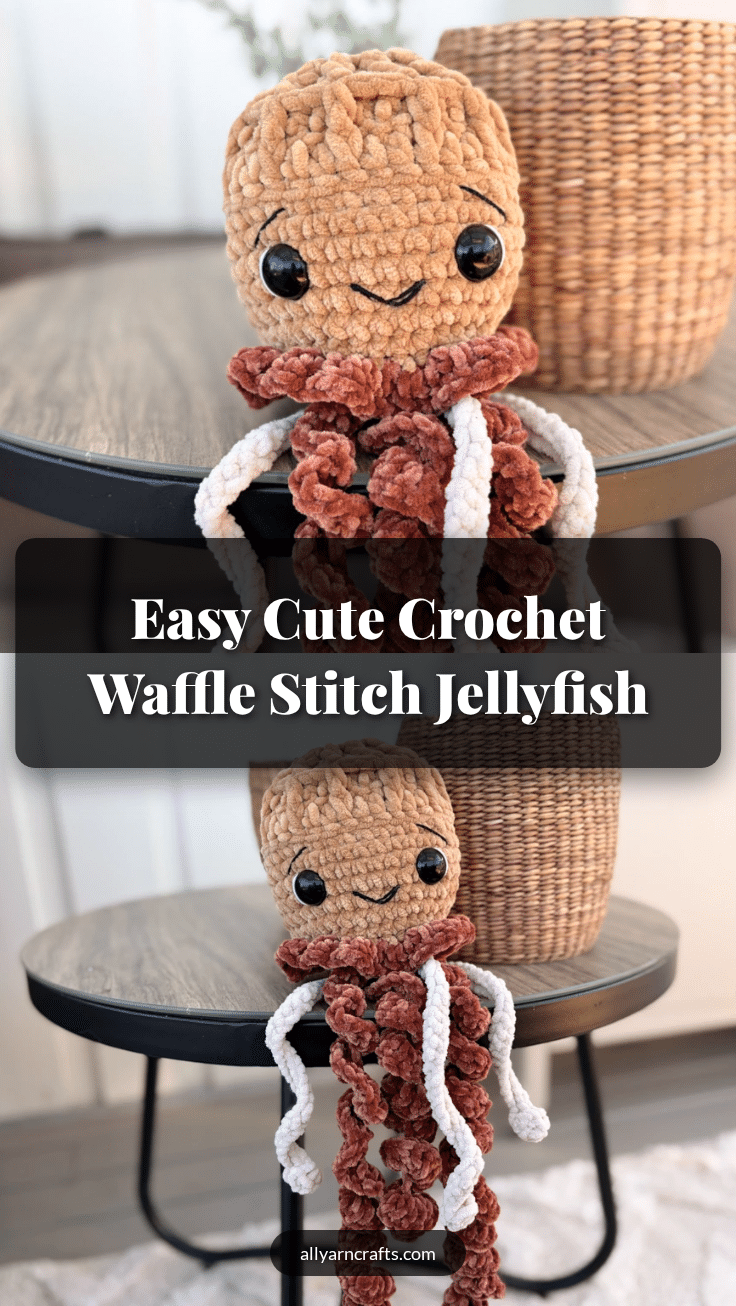
There is something undeniably charming about combining the whimsical world of sea creatures with the cozy, tactile appeal of comfort food. This crochet waffle stitch jellyfish brings that playful fusion to life, offering a unique twist on traditional amigurumi. Whether you are looking to add a splash of texture to your home decor or create a one-of-a-kind handmade gift, this project delivers both visual interest and a satisfying making experience.
Seasonal Styling Ideas
While the waffle stitch evokes the warmth of autumn and winter, this jellyfish is versatile enough to fit into any season. Its soft, plush texture makes it an ideal companion for cooler weather, perfect for snuggling on the couch. However, the bright pink accents and whimsical design also lend themselves beautifully to spring and summer themes. Consider placing it on a nursery shelf as a gentle, textured mobile alternative, or use it as a centerpiece for a beach-themed party table. The velvet yarn catches the light beautifully, making it a delightful addition to any shelf or windowsill display year-round.
Project Overview
This pattern creates a charming amigurumi jellyfish featuring a distinct waffle stitch texture on the head and body. The design is inspired by the creator’s love for combining food and animals, specifically drawing from Norwegian waffles with brunost (brown cheese). The project is worked in joining rounds, with all parts except the tentacles created in one continuous piece. The finished piece is soft, squishy, and highly customizable with different yarn choices and tentacle styles.
Materials
- Yarn (Color A): Velvet yarn in a primary light brown color. Approximately 80 g required. Note: Acrylic or cotton yarn can be used, but the finished size will be smaller.
- Yarn (Color B): Velvet yarn in pink or an optional accent color for the skirt and tentacles. Approximately 40 g required.
- Crochet Hook: 4.5 mm hook.
- Safety Eyes: 20 mm.
- Other Supplies: Filling materials, scissors, and a tapestry needle for weaving in ends.
- Face Details: Thin black yarn for eyebrows/lashes and white yarn for eye highlights.
Gauge and Finished Size
Finished Size: Approximately 40–45 cm in length, including the tentacles.
Note: Gauge is not explicitly provided in the source pattern. The finished size may vary depending on yarn weight and tension.
Abbreviations
- ch: chain
- rnd: round
- St(s): stitches
- Inc: increase
- dec: decrease
- sc: single crochet
- dc: double crochet
- fpdc: front post double crochet
- mr: magic ring
- sl st: slip stitch
- BLO: back loop only
- hdc: half double crochet
Pattern Notes
- All parts, except the tentacles, are made in one piece.
- The jellyfish is constructed in joining rounds.
- The ch 2 does not count as a stitch.
- Turn your work after each round for rounds 1–5 to create the waffle texture.
- From round 6 onward, continue working in the round without turning.
- The starting chain lengths for tentacles are suggestions; adjust them to change the jellyfish’s look.
Special Techniques
Front Post Double Crochet (fpdc)
Yarn over, insert hook from front to back to front around the post of the indicated stitch (instead of into the top loops). Yarn over, pull up a loop, yarn over, pull through 2 loops, yarn over, pull through remaining 2 loops.
Tip: When working in the round, the fpdc stitches from the previous round will stand out as raised vertical bars. These act as a guide: work fpdc around these posts, and regular dc into the stitches that sit further back.
Bobble Stitch
Yarn over, insert the hook into the stitch, and pull up a loop, yarn over and pull through 2 loops. Repeat until you have 4 loops on the hook. Yarn over and pull through all 4 loops.
Pattern Instructions
Head and Body
Work in Color A. Rounds 1–5 are worked in the waffle stitch pattern. From round 6 onward, work in single crochet (sc).
Rnd 1: 12 dc into the mr, sl st into the first st to join. Ch 2. (12 dc)
Rnd 2: Turn work. *1 dc in next st, 1 fpdc around the post of the corresponding stitch from the round below*. Repeat from *-* 12 times. Sl st into the first st to join. Ch 2. (24 st)
Rnd 3: Turn work. *2 dc in next st, 1 fpdc around the next post from the round below*. Repeat from *-* 12 times. Sl st into the first st to join. Ch 2. (36 st)
Rnd 4: Turn work. *1 dc into the next st, 1 fpdc into next 2 sts from the round below*. Repeat from *-* 12 times. Sl st into the first st to join. Ch 2. (36 st)
Rnd 5: Turn work. (This is the last time you turn the work now, and you are working on the right side). *1 dc into the next 2 sts, 1 fpdc into the st from the round below*. Repeat from *-* 12 times. Sl st into the first st to join, ch 1.
Rnd 6: 1 sc in each stitch BLO, sl st to join. Ch 1. (36 sc)
Rnd 7–13: 1 sc in each st, sl st to join. Ch 1. (36 sc)
Rnd 14: (4 sc, sc dec) x 6. Sl st to join. Ch 1. (30 sc)
Rnd 15: Work in BLO. (3 sc, sc dec) x 6. Sl st to join. Ch 1. (24 sc). Stuff the animal. Attach safety eyes between rounds 9–10, approx. 6 sts apart.
Rnd 16: sc dec x 9. (9 sc)
Sew the hole closed. Weave in ends.
Skirt
Work in Color B (pink or alternative). Work in the remaining loops from round 15. Hold the jellyfish upside down, with the head facing down and the opening towards you.
Rnd 1: Ch 2. *2 dc in next st, 3 dc in the next*. Repeat from *-* all the way around. Sl st to the first st to join. Cut the yarn and weave in ends.
Tentacles
Note: The starting chains are suggestions. Make 3 or more of each type depending on your preference.
Type 1 (Brown Yarn)
Ch 45. Work 3 hdc into the 3rd ch from the hook. Work 3 hdc into every ch until the end of the row. Cut the yarn, leaving a tail for sewing.
Type 2 (Pink/Alternative Yarn)
Ch 33. Work 1 bobble stitch into the 3rd ch from the hook (see Special Techniques above). Work 1 sl st in every stitch until the end of the chain. Cut the yarn, leaving a tail for sewing.
Assembly
- Sew the tentacles to the flat side of the body. Spread them evenly across the surface.
- For face details, embroider eyebrows or lashes using thin black yarn to make your jellyfish unique.
- Sew a small white stitch along the outer edge of each eye for a highlight.
- Weave in all remaining ends securely.
Tips
When working in the round, the fpdc stitches from the previous round will stand out as raised vertical bars. These act as a guide: work fpdc around these posts, and regular dc into the stitches that sit further back. If you run into problems with the waffle stitch, consider watching the accompanying video tutorial for visual guidance.
FAQs
Can I use cotton yarn instead of velvet yarn?
Yes, you can use acrylic or cotton yarn. However, please note that the finished result will be smaller than the specified 40–45 cm size.
How do I determine the length of the tentacles?
The pattern provides chain counts (45 and 33) as suggestions. You can adjust these starting chains to create longer or shorter tentacles to achieve the look you prefer.
What is the difference between the two tentacle types?
Type 1 tentacles are made with standard half double crochet stitches for a smooth look. Type 2 tentacles feature a bobble stitch at the top for added texture and visual interest.
When should I stuff the jellyfish?
Stuff the animal after completing Round 15 of the head and body, before closing the final hole in Round 16.
How do I attach the skirt?
The skirt is worked directly into the remaining loops from Round 15 of the body. Hold the jellyfish upside down to access these loops easily.
Pin This Crochet Pattern!