There is something deeply satisfying about watching a pile of chunky yarn transform into a structured, huggable form. The magic of amigurumi lies in the rhythm of the rounds—the steady increase of stitches that creates a flat disc, the straight rows that build a tube, and the decrease rounds that gently close the shape into a sphere. With chenille yarn, this process becomes even more tactile; the fuzzy halo of the fiber softens every stitch definition, forgiving minor tension inconsistencies while creating a cloud-soft finish. This pattern relies on that specific texture, using simple single crochet rounds to build a bear that feels as good as it looks. The focus here is on the shaping and the little details, like the placement of the eyes and the angle of the legs, that turn a simple crochet project into a character with personality.
Texture and Stitch Notes
Chenille yarn has a unique personality in amigurumi. Because the fibers are wrapped around a core, the yarn creates a “velvet” effect that hides the individual loops of the single crochet. This means you won’t see the crisp V-shape of the stitches as clearly as you would with cotton or acrylic. Instead, you are working by feel and count. The texture makes the bear look incredibly puffy and soft, perfect for a nursery or a gift basket. However, this fuzziness can make counting stitches slightly harder if you aren’t careful. The key to a neat finish is maintaining consistent tension. Unlike smooth yarns, chenille can stretch, so avoid pulling too tight, but ensure your stitches are snug enough to keep the stuffing from poking through later. The softness of the material also means that seams will be less visible, allowing for a cleaner, more integrated look once assembled.
Project Overview
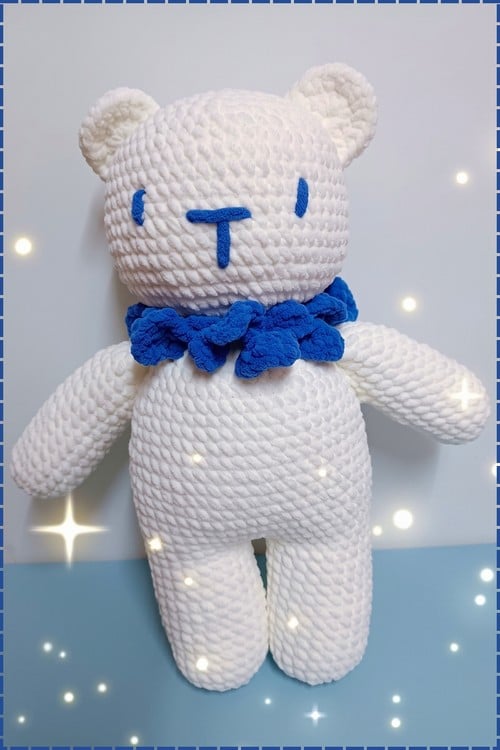
This chunky yarn bear is a classic amigurumi design that relies on simple geometry: circles for the head and muzzle, and tubes for the limbs. The bear features a simple embroidered face with three blue lines on a white chenille head, round ears perched high on top, and a ruffled collar. The body stands upright on thick legs, with arms held slightly out. The pattern is designed to be worked in continuous rounds, which eliminates the seam that would otherwise appear if you joined each round with a slip stitch. This technique creates a seamless spiral, enhancing the smooth, puffy appearance of the chenille yarn.
Materials
- Chunky polyester or microfiber yarn such as Ice Strip yarn
- Crochet hook sized for bulky yarn, typically 5 mm to 7 mm
- Safety eyes, two of them
- Fiberfill stuffing
- Stitch markers
- Yarn needle
- Scissors
- Black yarn for the embroidered nose
Gauge and Finished Size
Gauge and finished size measurements are not specified in the source pattern. The size of the bear will vary depending on the specific brand of chunky yarn and hook size used. Using standard worsted or aran weight yarn on a 4 mm hook will result in a bear roughly half the size of the chunky version.
Abbreviations
- SC: single crochet
- Inc: increase, 2 SC into the same stitch
- Dec: decrease, 2 stitches crocheted together
All pieces are worked in continuous rounds unless stated otherwise.
Pattern Notes
Chenille forgives uneven tension, making this a forgiving project for beginners. However, placing the face lines evenly is the only step worth slowing down for. The pattern allows for flexibility in how you join the head and body: you can either fasten off the head and sew the body on as a separate piece, or keep crocheting from where the head closes and build the body as a continuation. Sewing separately gives more control over positioning, while continuing in the round avoids a visible seam.
Pattern Instructions
Head and Body
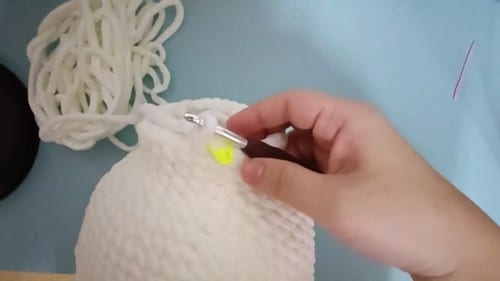
Round 1: Magic ring, 6 SC. [6]
Round 2: Work 2 SC in each stitch around. [12]
Round 3: Work 1 SC then 1 inc and repeat around. [18]
Round 4: Work 2 SC then 1 inc and repeat around. [24]
By round 4 the piece should be a flat even disc, lying level without curling, wide enough to span the palm comfortably.
Round 5: Work 1 SC in each stitch around. [24]
Round 6: Work 1 SC in each stitch around. [24]
Round 7: Work 1 SC in each stitch around. [24]
Insert the safety eyes now between rounds 6 and 7, 4 to 5 stitches apart, before continuing. The dome is fully open and the inside is accessible.
Round 8: Work 1 SC in each stitch around. [24]
By round 8 the shape should be a clear open dome, rounded from all sides, with the eyes visible at roughly the equator of the sphere.
Round 9: Work 2 SC then 1 dec and repeat around. [18]
Round 10: Work 1 SC then 1 dec and repeat around. [12]
Stuff the head firmly through the narrowing opening before this round closes it further. Push filling upward toward the crown first so the top stays round. Fasten off or continue into the body, depending on your construction method.
Ears — Make 2
Round 1: Magic ring, 6 SC. [6]
Round 2: Work 1 SC then 1 inc and repeat around. [9]
Fasten off leaving a long tail for sewing. Flatten the ear gently between your fingers before pinning to the head. Sew to the top of the head around rounds 3 or 4.
Arms — Make 2
Round 1: Magic ring, 5 SC. [5]
Rounds 2 to 5: Work 1 SC in each stitch around. [5]
By round 4 the arm is a narrow tube, closed at one end and open at the other. Lightly stuff the lower portion only. Flatten the top opening. Sew to the sides of the body just below the neck.
Legs — Make 2
Round 1: Magic ring, 6 SC. [6]
Round 2: Work 1 SC then 1 inc and repeat around. [9]
Rounds 3 to 6: Work 1 SC in each stitch around. [9]
By round 6 the leg is a short stocky tube, slightly wider than the arm, with a closed base. Stuff the legs with fiberfill. Sew to the bottom of the body, positioned slightly forward so the bear balances in a seated pose without tipping.
Muzzle
Round 1: Magic ring, 6 SC. [6]
Round 2: Work 2 SC in each stitch around. [12]
Fasten off leaving a long tail for sewing. Sew centred on the face, just below the eyes.
Tail
Round 1: Magic ring, 5 SC. [5]
Fasten off leaving a tail for sewing. Sew to the back centre of the body.
Nose
Using black yarn, embroider a small triangle or V shape on the upper muzzle. Add a short vertical stitch below the nose if desired.
Assembly
Pin everything before sewing anything. Chunky yarn makes repositioning after the first stitch is in much harder than with smooth yarn, and the pieces are large enough that a single stitch off-centre is visible from across the room.
- Ears: Sew first, onto the top of the head at rounds 3 or 4. Pin both at the same time and check from the front for height symmetry. Flatten each before pinning.
- Muzzle: Sew next, centred on the face below the eyes. The nose embroidery goes onto the muzzle, so get the muzzle right before touching the black yarn. Embroider the nose on the muzzle once it is sewn.
- Arms: Sew to the sides of the body just below the neck. Pin both at the same time to judge whether they sit level.
- Legs: Sew to the bottom of the body, angled slightly forward rather than straight down. Test the seated balance with pins in place before committing to any stitches.
- Tail: Sew last, to the back centre of the body.
Tips
- Safety Eyes: Push the washers firmly from the inside until they click down against the fabric. For any toy going to a child under three, skip the safety eyes and embroider two small black ovals in the same position instead, between rounds 6 and 7, before stuffing.
- Stuffing: Head: firm. Body: firm but a fraction softer than the head. Arms: lightly stuffed in the lower half only. Legs: stuffed, but not packed tight. Tail: no stuffing.
- Balance: If your bear will not sit upright, check the leg angle. The legs need to point slightly forward rather than straight down so the bear’s weight sits over its feet. Unpick the leg joins, repin with the legs angled more forward, and check balance before sewing again.
- Yarn Choice: Standard worsted or aran weight on a 4 mm hook gives a much smaller, firmer bear with the same stitch counts. The stitch definition will be clearer and counting will be easier.
FAQ
The pattern says to continue crocheting or attach the body depending on my construction method. What does that mean?
The pattern leaves the head-to-body join open to interpretation. You can either fasten off the head and sew the body on as a separate piece, or keep crocheting from where the head closes and build the body as a continuation. Either works. Sewing separately gives more control over positioning; continuing in the round avoids a seam.
My bear will not sit upright. What do I change?
Leg angle. The legs need to point slightly forward rather than straight down so the bear’s weight sits over its feet rather than behind them. Unpick the leg joins, repin with the legs angled more forward, and check balance before sewing again.
Can I use a different yarn?
Yes. Standard worsted or aran weight on a 4 mm hook gives a much smaller, firmer bear with the same stitch counts. The stitch definition will be clearer and counting will be easier. Finished size will be roughly half compared to Ice Strip or similar chunky microfiber.
How do I ensure the safety eyes are secure?
Push the washers firmly from the inside until they click down against the fabric. Ensure they are seated before stuffing the head, as the decreases in later rounds will close the opening.
Why is my bear’s head denting?
The head needs firm stuffing. Push filling upward toward the crown first so the top stays round. If the stuffing is too loose, the head will lose its spherical shape.
Pin This Crochet Pattern!