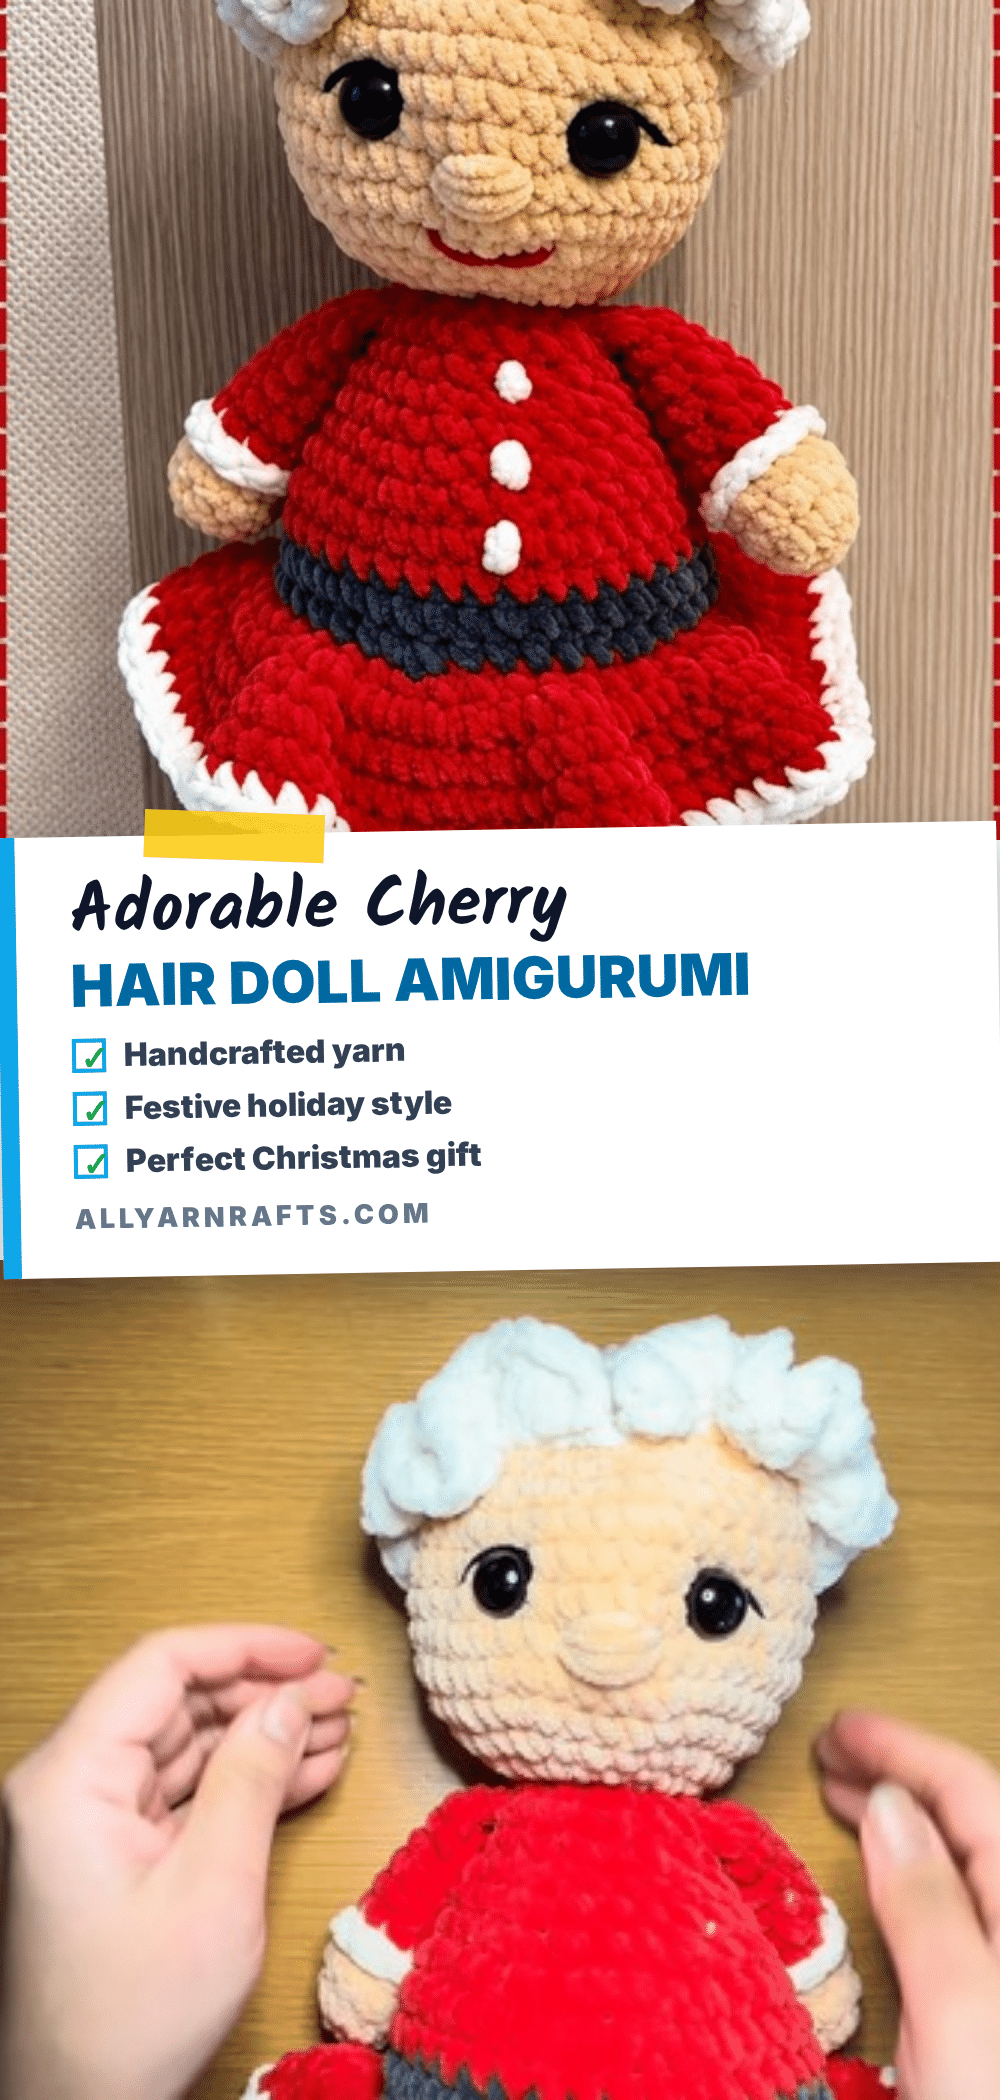
There is something undeniably magical about holding a finished amigurumi that looks like it stepped right out of a storybook. This adorable Cherry Hair Doll is the perfect example of that reaction—she is cute, display-worthy, and ready to bring a smile to any shelf or nursery. With her flared red skirt, white ruffled cuffs, and playful cherry hair clips, she is a delightful project that feels rewarding to make and even more rewarding to gift. Whether you are a seasoned maker or a beginner looking for a charming challenge, this pattern offers a wonderful blend of festive style and satisfying shaping.
Why the Finished Piece Stands Out
What truly makes this doll special is the texture and personality that plush yarn brings to the design. Unlike standard cotton or acrylic, plush yarn creates a soft, fuzzy exterior that hides the individual stitches, giving the doll a professional, polished look that is incredibly inviting to the touch. The contrast between the fluffy red hair, the crisp white trim, and the structured gray boots creates a visual depth that is hard to achieve with smoother yarns. She is not just a doll; she is a cozy companion that looks best when displayed on a mantel or a child’s shelf, where her cheerful expression and festive cherries can be fully appreciated.
Project Overview
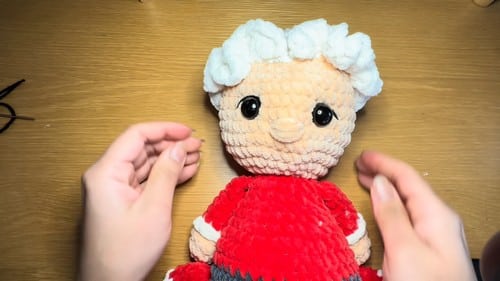
This amigurumi pattern guides you through creating a charming doll featuring a bun skirt, cherry hair clips, and a full head of curly hair. The project is worked in seamless rounds using basic crochet stitches, with assembly bringing all the separate components together into a cohesive character. The design includes specific checkpoints to help you monitor your shaping, ensuring the doll stands upright and maintains its proportions.
Materials
- Plush yarn in red
- Plush yarn in white
- Plush yarn in gray
- Plush yarn in skin tone
- Green yarn
- DK yarn in black
- 5.5 mm crochet hook
- 16 mm safety eyes
- Fiberfill stuffing
- Stitch marker
- Darning needle
- Scissors
Note on Yarn: Plush yarn hides stitches, which is both its main appeal and its main challenge. Count every round as you go because you cannot see errors later. A stitch marker is not optional here.
Gauge and Finished Size
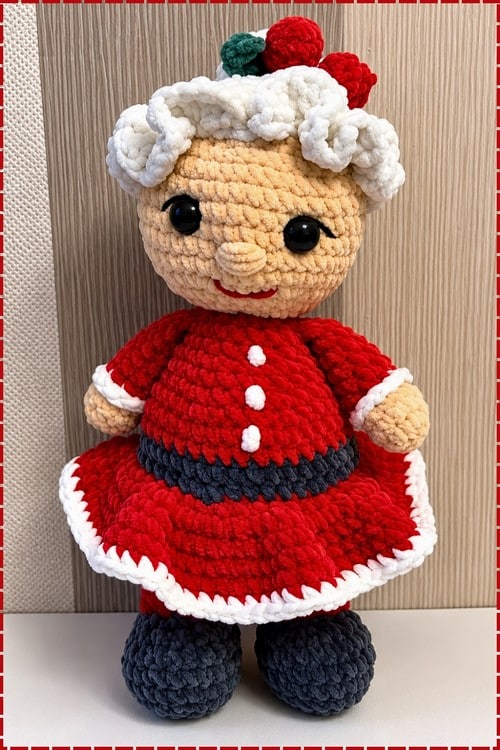
With plush worsted yarn and a 5.5 mm hook, expect a finished doll of roughly 10 to 13 inches tall. That estimate comes from typical plush doll proportions at this stitch count, not from a measurement in the pattern. Allow five to seven hours depending on your pace with plush yarn.
Abbreviations
- sc: single crochet
- hdc: half double crochet
- dc: double crochet
- inc: increase (two sc in one stitch)
- dec: decrease (sc two together)
- BLO: back loops only
- FLO: front loops only
- MR: magic ring
Pattern Notes
Plush yarn hides stitches, which is both its main appeal and its main challenge. Count every round as you go because you cannot see errors later. A stitch marker is not optional here.
Eyes go in during the head section, after round 10 and before round 11. The pattern specifically places them between rounds 3 and 4 of the head. Read carefully: the instruction appears after round 10 in the written sequence, which places it during the even rounds, but the text says between rounds 3 and 4. Insert them at round 3 to 4 level on the face while the head is still open and the backs can be pressed on from inside. Once decreases start in round 11 and stuffing goes in, you cannot reach. Press the backs on fully before moving forward.
For toys going to children under three, leave the 16 mm safety eyes out entirely. Embroider eyes with black DK yarn instead, using satin stitch in two small ovals at the same position. Plush yarn around embroidered eyes looks especially soft.
New to reading amigurumi patterns? No worries, just follow along with the video tutorial below and keep the written pattern handy as a reference!
Pattern Instructions
Arms (make 2)
Round 1: With skin tone yarn, MR, 6 sc. [6] Checkpoint: a tight flat circle. If the centre stays open, pull the tail harder before continuing.
Round 2: Inc in each stitch around. [12] Checkpoint: a small flat disc, still lying level on a table.
Round 3: Work 12 sc. [12] Checkpoint: the sides are just beginning to rise. The piece looks like a very shallow cup.
Round 4: 2 sc, 1 dec, repeat 3 times. [9] Checkpoint: the hand rounds in slightly, narrowing toward the wrist. Change to red yarn in BLO.
Round 5: Work 9 sc in BLO. [9] Checkpoint: a visible ridge of front loops sits at the colour change. That ridge becomes the sleeve cuff later.
Round 6: Work 9 sc. [9]
Round 7: Work 9 sc. [9]
Round 8: Work 9 sc. [9]
Round 9: Work 9 sc. [9] Checkpoint: a slim tube in red above a small rounded hand. The tube should be straight and even. Stuff three quarters full. Flatten the top and single crochet 4 stitches across to close. Attach white yarn to the front loops left from round 4 and work 9 sc for the cuff. Checkpoint: the white cuff should ruffle slightly outward from the ridge, framing the hand. Fasten off, leaving a tail.
Legs (make 2)
Round 1: With gray yarn, MR, 7 sc. [7] Checkpoint: a small tight circle, slightly wider than the arm start.
Round 2: Inc in each stitch around. [14]
Round 3: 1 sc, 1 inc, repeat 7 times. [21] Checkpoint: a flat oval disc, wide enough to become a shoe sole.
Round 4: Work 21 sc. [21]
Round 5: Work 21 sc. [21] Checkpoint: the sides are rising. The piece should look like a rounded shoe box from the side.
Round 6: 6 sc, 5 dec, 5 sc. [16] Checkpoint: the toe end narrows while the back stays wide. A recognisable shoe shape emerging.
Round 7: 1 dec, 4 sc, 3 dec, 4 sc. [12] Checkpoint: the foot is now clearly shaped, narrowed across the toe and ankle. Stuff the foot. Change to red yarn.
Round 8: Work 12 sc. [12]
Round 9: Work 12 sc. [12]
Round 10: Work 12 sc. [12] Checkpoint: a short red leg sitting on a gray shoe. Stand both legs side by side and check they match before joining. Fasten off the first leg. Do not fasten off the second leg.
Body
Chain 3 from the second leg and join to the first leg.
Round 1: Work 12 sc around the first leg, 3 sc in the chains, 12 sc around the second leg, 3 sc in the back of the chains. [30] Checkpoint: both legs are now joined into one wide oval. The chain bridge should lie flat with no gap or hole at the join.
Round 2: 4 sc, 1 inc, repeat 6 times. [36]
Round 3: 5 sc, 1 inc, repeat 6 times. [42] Checkpoint: a wide flat circle that will become the lower body. Count to 42 carefully in plush yarn.
Round 4: Work 42 sc. [42]
Round 5: Work 42 sc. [42]
Round 6: Work 42 sc. [42]
Round 7: Work 42 sc. [42]
Round 8: Work 42 sc. [42] Checkpoint: after round 8 the body is a short wide cylinder. It should feel full and round, with the legs hanging below. Change to gray yarn in BLO.
Round 9: 5 sc, 1 dec, repeat 6 times. [36] Checkpoint: a gray ridge of front loops sits at this round. The skirt attaches here later. The body tapers slightly inward.
Round 10: Work 36 sc. [36] Change to red yarn.
Round 11: Work 36 sc. [36]
Round 12: Work 36 sc. [36]
Round 13: 4 sc, 1 dec, repeat 6 times. [30]
Round 14: 3 sc, 1 dec, repeat 6 times. [24] Checkpoint: the body is narrowing toward the neck. The waist should feel clearly smaller than the hip area.
Round 15: Work 24 sc. [24]
Round 16: 2 sc, 1 dec, repeat 6 times. [18]
Round 17: Work 18 sc. [18]
Round 18: 1 sc, 1 dec, repeat 6 times. [12] Checkpoint: a narrow opening at the top ready for the head. Stuff firmly before fastening off. Stuff firmly. Fasten off.
Head
Attach skin tone yarn to the top of the body.
Round 1: Inc in each stitch around. [24] Checkpoint: the head base is already twice the width of the neck opening.
Round 2: 3 sc, 1 inc, repeat 6 times. [30]
Round 3: 2 sc, 1 inc, 2 sc, repeat 6 times. [36] Checkpoint: a shallow bowl shape. This is the level where eyes will sit.
Round 4: 5 sc, 1 inc, repeat 6 times. [42] Checkpoint: a wider dome, still open at the top.
Round 5: Work 42 sc. [42]
Round 6: Work 42 sc. [42]
Round 7: Work 42 sc. [42]
Round 8: Work 42 sc. [42]
Round 9: Work 42 sc. [42]
Round 10: Work 42 sc. [42] Checkpoint: the head is a tall round dome at its fullest point. Insert eyes now between rounds 3 and 4 before continuing. Insert safety eyes between rounds 3 and 4.
Round 11: 5 sc, 1 dec, repeat 6 times. [36]
Round 12: 4 sc, 1 dec, repeat 6 times. [30]
Round 13: 3 sc, 1 dec, repeat 6 times. [24]
Round 14: 2 sc, 1 dec, repeat 6 times. [18] Checkpoint: the head is closing fast. Stuff firmly now if you haven’t already.
Round 15: 1 sc, 1 dec, repeat 6 times. [12] Stuff firmly.
Round 16: Dec 6 times. [6] Fasten off and close.
Skirt
Attach red yarn to the front loops left from body round 9.
Round 1: Work sc around. Checkpoint: the skirt starts at the hip ridge, flaring away from the body.
Round 2: Inc in each stitch. Checkpoint: the skirt is noticeably wider after this round and should flare outward.
Round 3: Work sc around.
Round 4: Work sc around.
Round 5: Work sc around. Checkpoint: a full flared skirt with five rounds of depth. It should stand out from the body clearly. Attach white yarn to the bottom edge and work sc around for the trim. Fasten off.
Hair and Bun
Round 1: With white yarn, MR, 6 sc. [6]
Round 2: Inc in each stitch around. [12]
Round 3: 1 sc, 1 inc, repeat 6 times. [18]
Round 4: 2 sc, 1 inc, repeat 6 times. [24] Checkpoint: a flat white circle, this is the bun base.
Round 5: Work 24 sc. [24]
Round 6: Work 24 sc. [24]
Round 7: Work 24 sc. [24] Checkpoint: a small dome shape, like a bun roll.
Round 8: 1 sc, 1 dec, repeat 8 times. [16]
Round 9: Dec 8 times. [8] Checkpoint: the bun portion is nearly closed. Stuff lightly before proceeding. Stuff the bun lightly. Continue shaping the head covering portion with increase rounds to reach 54 stitches. Checkpoint: the piece should be a large flat cap shape wide enough to drape over the top and back of the head. Fasten off, leaving a long tail.
Hair Curls (make 2)
Chain 10. Skip 2 chains. Work 4 dc in the third chain. Checkpoint: a small fan of stitches anchoring the curl. Work 4 dc in each remaining chain. Checkpoint: the piece should spiral naturally into a loose curl as you go. Fasten off.
Cherries (make 2)
Round 1: MR, 5 sc. [5]
Round 2: Inc in each stitch around. [10] Checkpoint: a flat circle, small and compact.
Round 3: Work 10 sc. [10] Checkpoint: the sides rise to form a small cup.
Round 4: Dec 5 times. [5] Checkpoint: the cherry closes into a round ball. Stuff lightly before the hole gets too small. Stuff lightly and fasten off.
Leaf
Chain 6. Skip the first chain. Work 1 sc. Work 1 hdc. Work 1 dc. Work 1 hdc. Work 1 sc. Checkpoint: a small pointed oval, narrow and leaf-shaped. Fasten off.
Assembly
Sew arms below the neck on each side of the body. Sew the hair piece onto the head. Attach the bun at the back. Sew the curls to the front. Embroider the nose. Embroider any additional eye detail and smile. Add white buttons. Attach the cherries and leaf to the bun.
There are a lot of pieces here. Lay them all out before picking up the needle. The order matters, so work through it top to bottom. Start with the arms. Pin each one below the neck at the shoulder join, level with each other and with the hands pointing outward at the same angle. Check from the front. Sew all the way around the flattened top edge. The hair piece goes on next. It drapes over the head from front to back, and you want it centred before a single stitch goes in. The long tail gives you plenty to work with; anchor at the top of the head and stitch around the perimeter. Sew the bun to the back of the hair piece, not the head directly. Curls attach to the front of the hair at either side of the face. The cherry stems are usually a short length of green yarn twisted and knotted at both ends, with a cherry at the base of each. Pin the leaf and both cherries together first to get the arrangement right before sewing to the bun. The skirt is already attached. Buttons go on the body front wherever looks right to you.
Tips
- Plush yarn hides stitches, which is both its main appeal and its main challenge. Count every round as you go because you cannot see errors later. A stitch marker is not optional here.
- For toys going to children under three, leave the 16 mm safety eyes out entirely. Embroider eyes with black DK yarn instead, using satin stitch in two small ovals at the same position. Plush yarn around embroidered eyes looks especially soft.
- Arms get three quarters of their tube filled, leaving the top flat enough to close with the single crochet seam. Too much stuffing and the arm won’t flatten for closing.
- The foot gets stuffed before the colour change to red, firmly enough to hold the shoe shape.
- The body stuffs firmly at round 18 after all the decreases have narrowed the opening to 12 stitches.
- Head stuffing happens in two passes: some at round 14 while there is still room to pack it well, and a top-up before the final decrease round.
- The bun stuffs lightly. Its job is to look round, not to feel solid.
- Cherries stuff very lightly too, just enough to hold a sphere shape.
- The specific thing about plush yarn stuffing: the yarn is so lofty that over stuffing shows earlier than with regular cotton. If stitches start to separate, that is the sign to stop adding fiberfill.
- Cannot find stitches in the plush yarn. Use a bright contrast stitch marker and count every round before moving on. Plush yarn will not let you go back and correct easily.
- The join between the legs has a visible hole. Work the chain bridge stitches snugly and pick up both sides of the chain on the return. A loose join can be stitched closed with matching yarn after the fact.
- Arms are uneven lengths. Count each sleeve round individually, not by feel. Plush yarn rounds look similar and it is easy to add one extra.
- The skirt sits at the wrong height. The front loops from body round 9 are the attachment point. If the gray color change row is visible, those are the loops to use.
- The hair piece does not reach around the head. The source pattern describes continuing with increase rounds after the bun to reach 54 stitches, but does not specify how many rounds that takes. Work as many increase rounds as needed until the cap fits the head of your doll.
- Safety eyes won’t snap in after round 10. They need to go in earlier. The instruction appears late in the written sequence but the eye placement is at rounds 3 to 4. Always insert eyes at the placement round stated, not at the round where the instruction appears in the text.
- Substituting regular worsted keeps the stitch counts workable but changes the look completely. The doll will still hold shape, just without the plush texture. If you want the texture without plush yarn, a brushed mohair blend over smooth acrylic gives a softer result.
- To scale up, move to a bulky plush with a 6 mm hook. The increases and decreases work the same way. The doll grows roughly 30 percent. To scale down there is no reliable substitute for plush yarn at a smaller weight, so a smooth DK with a 3.5 mm hook and the same pattern gives a smaller version without the texture.
- Yes, and the pattern works fine with worsted acrylic. You will lose the plush texture but the doll shape stays the same. Use a 4.5 mm hook with standard worsted for similar sizing.
- Cut two lengths of green yarn about 3 inches each, fold each in half, and tie a knot at the fold. That creates a loop at the top for attaching and a tail that ends near the cherry. Sew the tail into the top of the cherry and the loop into the bun.
- My plush yarn keeps splitting when I try to decrease. Work decreases slowly and push the hook through carefully. The invisible decrease works better in plush than the standard sc2tog because you only enter the front loop, which is easier to find.
- The skirt doesn’t flare enough. Round 2 doubles the stitches. If it still feels flat, add a third increase round before the even rounds. Plush yarn has more body than cotton, so a little extra increase helps the skirt lay out.
- How do I keep the bun from flopping forward? Sew it down at multiple points around the perimeter of the hair piece, not just through the centre. A few stitches at the sides and across the top hold it upright against any pulling.
FAQs
Can I use regular yarn instead of plush yarn?
Yes, the pattern works fine with worsted acrylic. You will lose the plush texture but the doll shape stays the same. Use a 4.5 mm hook with standard worsted for similar sizing.
How do I attach the cherry stems?
Cut two lengths of green yarn about 3 inches each, fold each in half, and tie a knot at the fold. That creates a loop at the top for attaching and a tail that ends near the cherry. Sew the tail into the top of the cherry and the loop into the bun.
Why are my arms uneven?
Arms are uneven lengths because plush yarn rounds look similar and it is easy to add one extra by feel. Count each sleeve round individually to ensure they match.
When should I insert the safety eyes?
Safety eyes need to go in earlier than the written instruction suggests. Insert them between rounds 3 and 4 of the head while the head is still open, before decreases start in round 11.
How do I fix a skirt that doesn’t flare?
If the skirt feels flat, add a third increase round before the even rounds. Plush yarn has more body than cotton, so a little extra increase helps the skirt lay out.
Pin This Crochet Pattern!