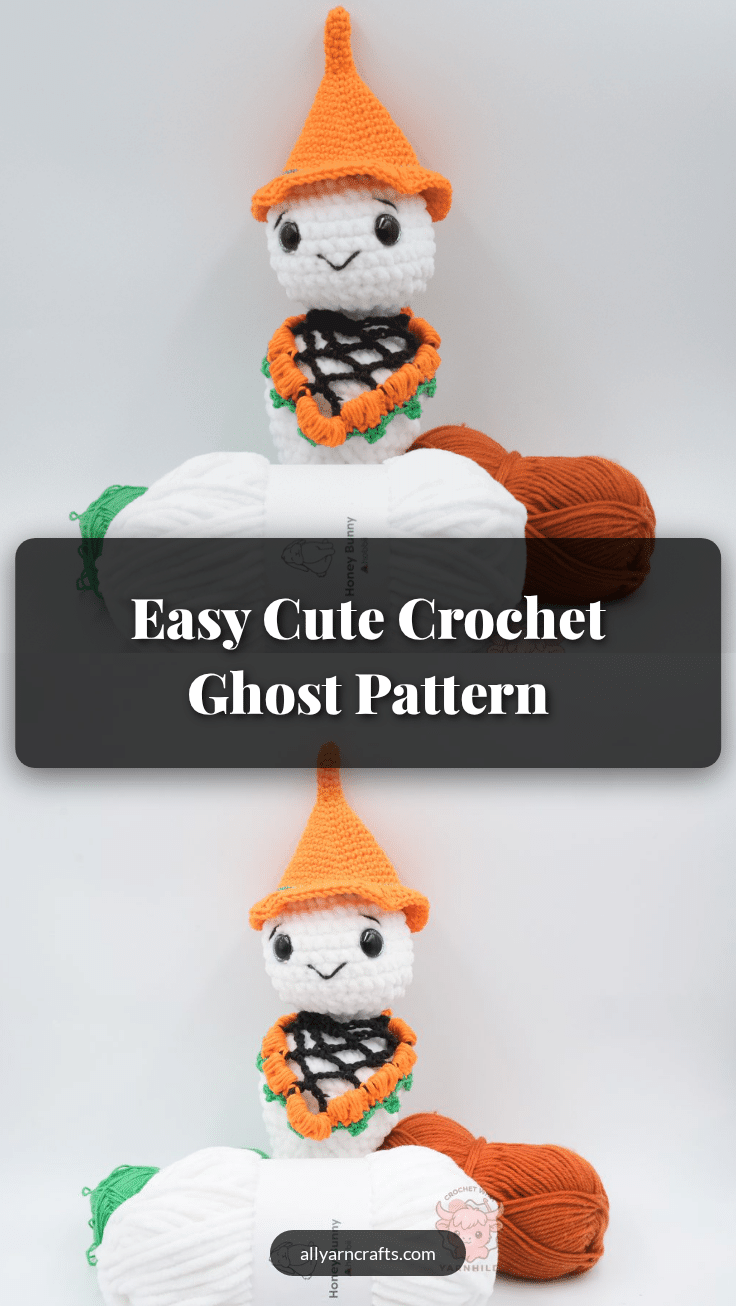
There is something undeniably magical about the moment you pull a skein of yarn from the back of your stash bin and realize it is the perfect match for a project you have been dreaming about. For this pattern, the decision was made before the first stitch was even crocheted. I reached for a plush, white chenille yarn—specifically Hobbii Baby Snuggle—because its soft, velvety texture immediately suggested a creature that was both spooky and cuddly. The contrast of crisp cotton yarn for the accessories felt like an intentional choice to give the character structure and personality, turning a simple amigurumi into a charming Halloween companion named Rim.
Yarn and Color Notes
The visual appeal of Rim the Ghost comes from the thoughtful pairing of materials. The main body relies on chenille yarn to create that signature “cloud-like” softness that defines modern amigurumi. However, the accessories require a different approach. By switching to sports weight cotton yarn for the witch hat and pumpkin shawl, the pattern ensures these components hold their shape and provide a textural contrast against the plush body. The color palette is classic Halloween: a crisp white for the ghost, deep black for the witch hat, vibrant orange for the pumpkin details, and a touch of green for the hat band and shawl accents. This combination ensures Rim looks festive and intentional, whether displayed on a mantle or held in your hands.
Project Overview
Rim the Ghost is an intermediate-level amigurumi project that combines classic shaping techniques with unique textural stitches. Designed for crocheters who have made a few amigurumi projects before, this pattern challenges you with new textures, specifically the pumpkin puff stitches on the shawl. Rim features a soft, plush body, a structured witch hat, and a unique shawl adorned with tiny pumpkins. The project is perfect for Halloween decor or as a seasonal gift.
Materials
- Main Body (Ghost): Chenille yarn (white), approx. 40g. (Recommended: Hobbii Baby Snuggle).
- Accessories (Hat & Shawl): Cotton yarn, sports weight.
- Color B (Black): approx. 30g
- Color C (Orange): approx. 40g
- Color D (Green): approx. 10g
- Crochet Hooks: 4.5 mm and 3.5 mm
- Safety Eyes: 20 mm (smaller or bigger is optional)
- Stuffing: Fiberfill stuffing
- Tools: Scissors, tapestry needle, black embroidery thread
- Optional: Stabilizer insert (small circle of cardboard or thin plastic) for the head
Gauge and Finished Size
Gauge and finished size measurements are not specified for this pattern. The size of Rim will depend on your tension and the specific yarn weight used. The pattern is designed to be worked in continuous spiral rounds for the body and hat, and in rows for the shawl.
Abbreviations
- ch – chain
- MR – magic ring
- rnd – round
- st – stitch
- sc – single crochet
- hdc – half double crochet
- dc – double crochet
- tr – treble crochet
- sc inc – increase (2 sc in the same stitch)
- sc2tog – single crochet two stitches together (decrease)
- sc3tog – single crochet three stitches together
- BO – bobble stitch (see instructions below)
- *—* – repeat action
- FLO – front loop only
Pattern Notes
- The head and all other parts are crocheted in continuous spiral rounds. Use a stitch marker and move it up as you go.
- The ghost’s main body is made using chenille yarn, which makes him super soft and plush. The accessories—the witch hat and the pumpkin shawl—are made with cotton yarn for shape and contrast.
- If you want to make a bigger shawl, repeat the *—* part one more time for each row.
Pattern Instructions
Head
In color A (White Chenille)
Rnd 1: 8 sc in a MR = 8 sc
Rnd 2: sc inc x 8 = 16 sc
Rnd 3: (1 sc, sc inc) x 8 = 24 sc
Rnd 4: (2 sc, sc inc) x 8 = 32 sc
Rnd 5–10: 32 sc
Insert safety eyes between Rnd 7 and 8, about 5 sts apart.
Add stuffing.
Rnd 11: (2 sc, sc dec) x 8 = 24 sc
Rnd 12: (1 sc, sc dec) x 8 = 16 sc
Rnd 13: sc dec x 8 = 8 sc
Sl st into the first st and fasten off. Leave a tail.
The Body
Crocheted from the bottom. In white.
Rnd 1: 4 sc in a MR = 4 sc
Rnd 2: (1 sc, sc inc) x 2 = 6 sc
Rnd 3: (2 sc, sc inc) x 2 = 8 sc
Rnd 4: (1 sc, sc inc) x 4 = 12 sc
Rnd 5: (2 sc, sc inc) x 4 = 16 sc
Rnd 6-7: 16 sc
Rnd 8: (3 sc, sc inc) x 4 = 20 sc
Rnd 9: sc dec x4, 8 sc, sc inc x4 = 20 sc
Rnd 10: 20 sc
Rnd 12: (1 sc, sc inc) x 4, (1 sc, sc2tog) x4 = 20 sc
Rnd 13: (1 sc, sc inc) x 10 = 30 sc
Rnd 14-19: 30 sc
Rnd 20: (3 sc, sc2tog) x 6 = 24 sc
Rnd 21: (1 sc, sc2tog) x 8 = 16 sc
Rnd 22: sc2tog x 8 = 8 sc
Sl st into the first st and fasten off.
Shawl
In color B (Cotton Yarn). Use 3.5 mm crochet hook.
Row 1: Ch 10, 1 tr in the first ch. Turn work.
Row 2: Ch 10, turn work, 1 sc into the first ch sp, ch 6, 1 tr into the same ch sp.
Row 3: Ch 10, turn work, 1 sc into the first ch sp, ch 6, 1 sc into the next ch sp, ch 6, 1 tr into the same ch sp.
Row 4: Ch 10, turn work, 1 sc into the first ch sp, *ch 6, 1 sc into the next ch sp*. Repeat from *-* 1 more time. Ch 6, 1 tr into the same ch sp.
Row 5: Ch 10, turn work, 1 sc into the first ch sp, *ch 6, 1 sc into the next ch sp*. Repeat from *-* 2 more times. Ch 6, 1 tr into the same ch sp.
Row 6: Ch 10, turn work, 1 sc into the first ch sp, *ch 6, 1 sc into the next ch sp*. Repeat from *-* 3 more times. Ch 6, 1 tr into the same ch sp.
If you want to make a bigger shawl, repeat the *—* part one more time for each row.
Pumpkin Stitch (worked in the ch-space)
Continue with color C (Orange). Sl st into the ch sp, ch 2.
*(YO, pull up loop) x4, YO, pull through 8 loops. YO and pull through 2 loops*. Repeat from *-* one more time until you have 2 puff stitches (pumpkins) in the ch sp.
Ch 2, sl st into the same ch sp, sc in the next st, sl st into the next ch sp. Ch 2 and repeat *-* to make the 2 pumpkins. Ch 2, sl st into the same ch sp, sc in the next st, sl st into the ch sp.
Repeat this frequency all around the shawl. Instead of 2 pumpkins on the pointy part of the shawl, place 3 pumpkins.
At the end of the last pumpkin, change to green yarn on the last pull through.
*Ch 2, 1 sc in the ch 2 sp, sc2tog over the 2 pumpkins, 1 hdc, ch 2, sl st into the base of the hdc, 1 sc next ch 2 sp, ch 2* Repeat from *-* to the pointy part. 1 sc in the ch 2 sp, sc3tog, ch 3, 1 dc, ch 3, sl st into the base of the last dc, *1 sc in the next ch 2 sp, ch 2, 1 sc into the next ch 2 sp, sc2tog over the 2 pumpkins, 1 hdc, ch 2, sl st into the base of the hdc, 1 sc next ch 2 sp* Repeat from *-* to the edge of the shawl.
Hat
Color: Black and one contrast color.
Hat Cone
Rnd 1: 6 sc in a magic ring (6)
Rnds 2–7: sc in each st (6 rounds) (6)
Rnd 8: (1 sc, inc) x3 (9)
Rnd 9: (2 sc, inc) x3 (12)
Rnd 10: (3 sc, inc) x3 (15)
Rnd 11: (4 sc, inc) x3 (18)
Rnd 12: (5 sc, inc) x3 (21)
Rnd 13: (6 sc, inc) x3 (24)
Rnd 14: (7 sc, inc) x3 (27)
Rnd 15: (8 sc, inc) x3 (30)
Rnd 16: (9 sc, inc) x3 (33)
Rnd 17: (10 sc, inc) x3 (36)
Rnd 18: (11 sc, inc) x3 (39)
Rnd 19: (12 sc, inc) x3 (42)
Rnd 20: (13 sc, inc) x3 (45)
Hat Band (green yarn)
Rnd 21: Change to green. (14 sc, inc) x3 (48)
Hat Brim
Rnd 22: Change back to black and work in FLO. (dc inc, 1 dc) around = 72 dc
Sl st into the first stitch and cut the yarn. Leave a strand if you wish to sew the hat on the ghost.
Assembly
Attaching the Head
Before sewing the head and body together, make sure they are both fully stuffed. The bottom of the head should be firm so it keeps its shape. You can optionally add a small circle of cardboard or thin plastic inside the head for extra support. Let it sit flat at the bottom of the head and gently slide part of it into the top of the body to keep everything steady.
Position the head on top of the body and sew it on using a whip stitch or your preferred joining method. Add a bit more stuffing as you go if needed. Once it’s secure, weave in the ends and shape everything into place.
Final Assembly
Embroider a mouth and add eyebrows or eyelashes if you’d like — this is where Rim really gets her personality! Weave in all yarn ends and shape the ghost gently with your hands. Adjust the hat and shawl to sit nicely in place.
Tips
- Head Stability: The bottom of the head should be firm so it keeps its shape. You can optionally add a small circle of cardboard or thin plastic inside the head for extra support. Let it sit flat at the bottom of the head and gently slide part of it into the top of the body to keep everything steady.
- Texture Contrast: Using cotton yarn for the hat and shawl ensures these pieces hold their shape better than the plush chenille used for the body, creating a professional, structured look.
- Stitch Marker: Since the head and body are worked in continuous spiral rounds, always use a stitch marker and move it up with each round to keep track of your stitch counts.
FAQs
What type of yarn is best for the ghost body?
The pattern recommends chenille yarn, such as Hobbii Baby Snuggle, for the main body. This yarn creates a super soft and plush texture that is perfect for amigurumi. However, you can use any worsted weight yarn if you prefer, though the texture will be different.
How do I make the pumpkin stitch?
The pumpkin stitch is a variation of a puff stitch. You yarn over and pull up a loop 4 times in the same stitch, then yarn over and pull through all 8 loops on the hook. Yarn over again and pull through the remaining 2 loops. Repeat this once more in the same space to create two “pumpkins” per cluster.
Can I make the shawl larger?
Yes. If you want to make a bigger shawl, simply repeat the *—* part one more time for each row of the shawl base before adding the pumpkin stitch details.
What hook size should I use?
Use a 4.5 mm hook for the chenille yarn body and head. Use a 3.5 mm hook for the cotton yarn accessories (hat and shawl) to ensure they remain structured and do not stretch out.
Is this pattern suitable for beginners?
This pattern is not for total beginners. It is best suited for crocheters who have made a few amigurumi projects before and are comfortable with continuous rounds, increases, decreases, and working with multiple yarn colors.
If you enjoy making character-based amigurumi, you might also like exploring other crochet patterns available on the site. For those looking for larger home decor items, consider checking out our cozy crochet floor pouf or a crochet blanket pattern for a complete seasonal setup.
Pin This Crochet Pattern!